 3.The graphical environment
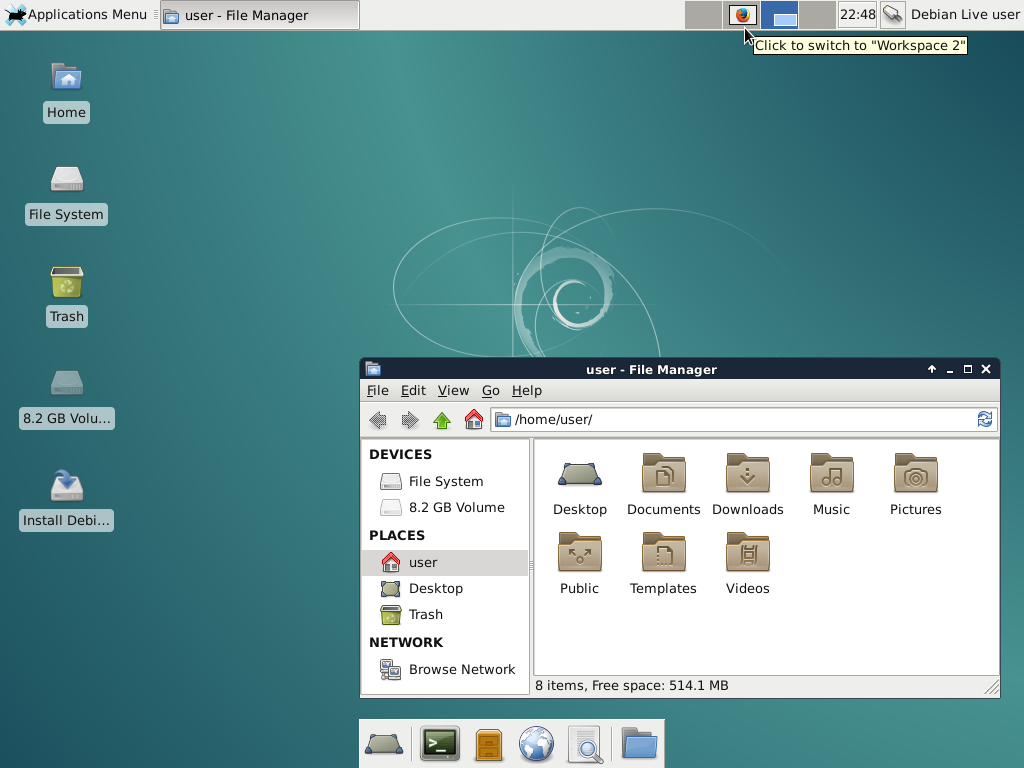
Let's start by looking at the various elements displayed on the screen . On this simple image, you can already identify the first elements which are explained below in this handbook:
The " panel " or task bar (at the top of the screen , in this example, but can be moved wherever you wish)) which includes, from left to right:
-
a collection of launchers (small icons) for your favorite applications,
-
the time,
-
the notification area, (showing the wired network connection),
-
the user button which allows you to quit your working session, stop or restart your computer,
a file manager window which displays the folders contained in your home directory .
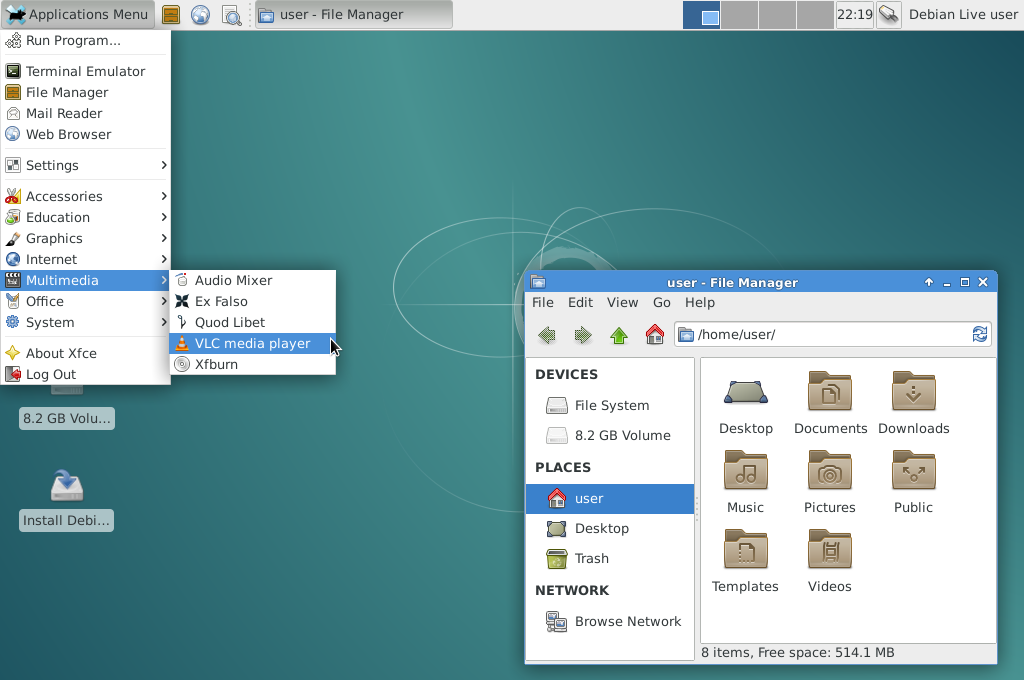
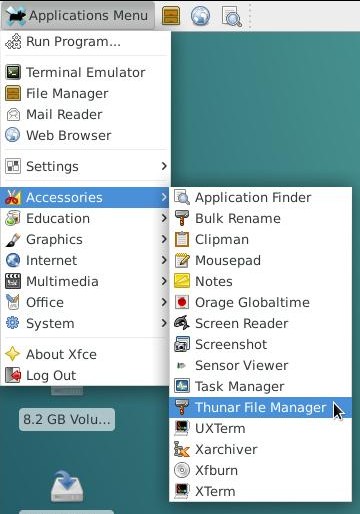
The
Xfce
desktop with the
application menu
and Thunar
 One word about the
graphical libraries
.
One word about the
graphical libraries
.
To display on the
screen
the
graphical interface
, each desktop uses a rendering engine depending upon certain libraries. All the desktops, available by default on Debian, operate with the
GTK
rendering engine, except
KDE
which operates with
Qt
.
This difference in the usage of the graphical libraries, generates the doubling of the dependencies when installing on a GTK system, an application which was developed for the
KDE
environment (and vice versa).
Take good care to select applications fitting with your main environment, in order to avoid overloading the graphical libraries.
3.1.The task bar
The "panel", the task bar, the notification area… all these words to talk about the information and launcher interface of your system.
Usually, it is a banner located at the top or the bottom of your screen, displaying several types of information, launchers, menus to quickly access your data or your applications, but also to inform you (new email has arrived, what time it is, a USB disk was just plugged in …) via the notification area.
Here after a quick overview of the various "panels" on the Debian desktops:


Irrelevant of the type of desktop, the task bar displays, at least, the following elements:
An application menu , allowing you to access to the installed software .. In genral, the applications are sorted and grouped by categories (Multimedia, Office …) and are launched by a left-click on their labels or icons.
A list of active windows or at least the title of the active windows . Depending on the context, a left click on the corresponding button will minimize, restore or bring to the foreground the target application.
The time with the date also displayed when the cursor hovers on the area. On some desktops an agenda is open by a left-click on the time.
A notification area with more or less information, depending on the desktop, intended to display messages coming from your applications (new email, network connection …)
An action button to quit the working session, to suspend, stop or restart your computer. Depending on your configuration you might switch user, with this button, and take advantage of the multi- user mode of the Debian GNU/Linux systems.
Like almost all the elements of the GNU/Linux desktops, the task bar can be configured and embellished by plug-in (little specialized modules) or simply removed !
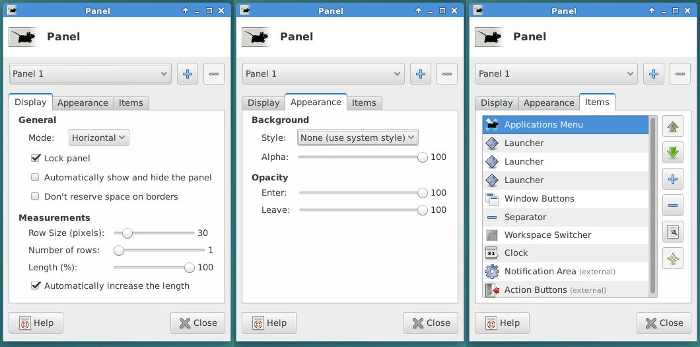
A right-click on the "panel " opens a drop down menu allowing you to change its configuration (except for the Gnome-3 desktop). Hereafter an example of configuration for the Xfce panel:
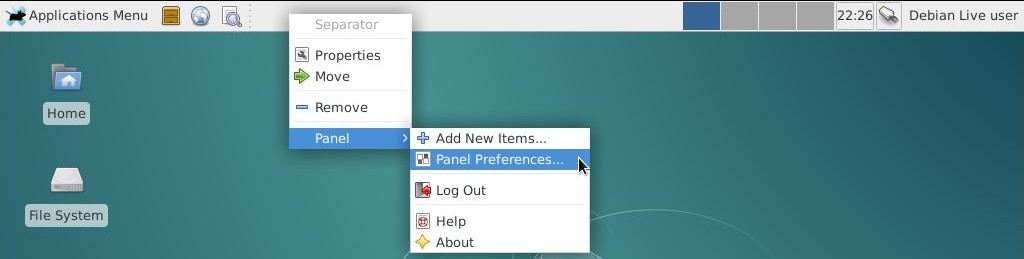
Accessing the
Xfce
panel
configuration with a
right-click
More details in the GNU/Linux desktop discovery section (chap.4.2)
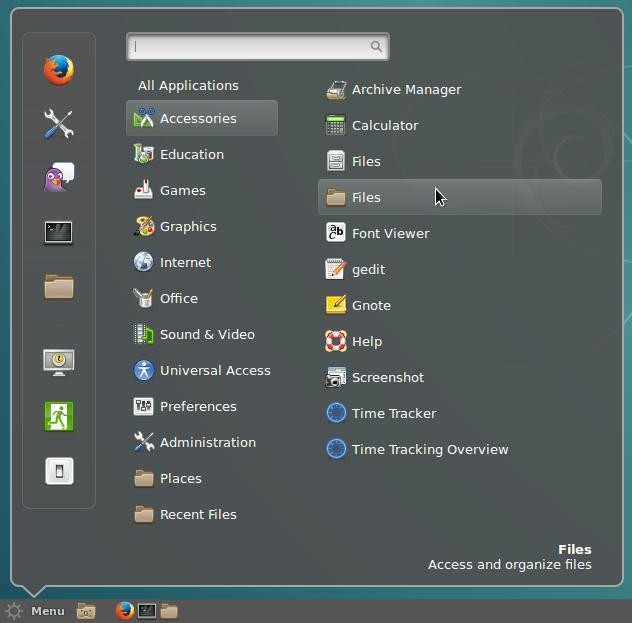
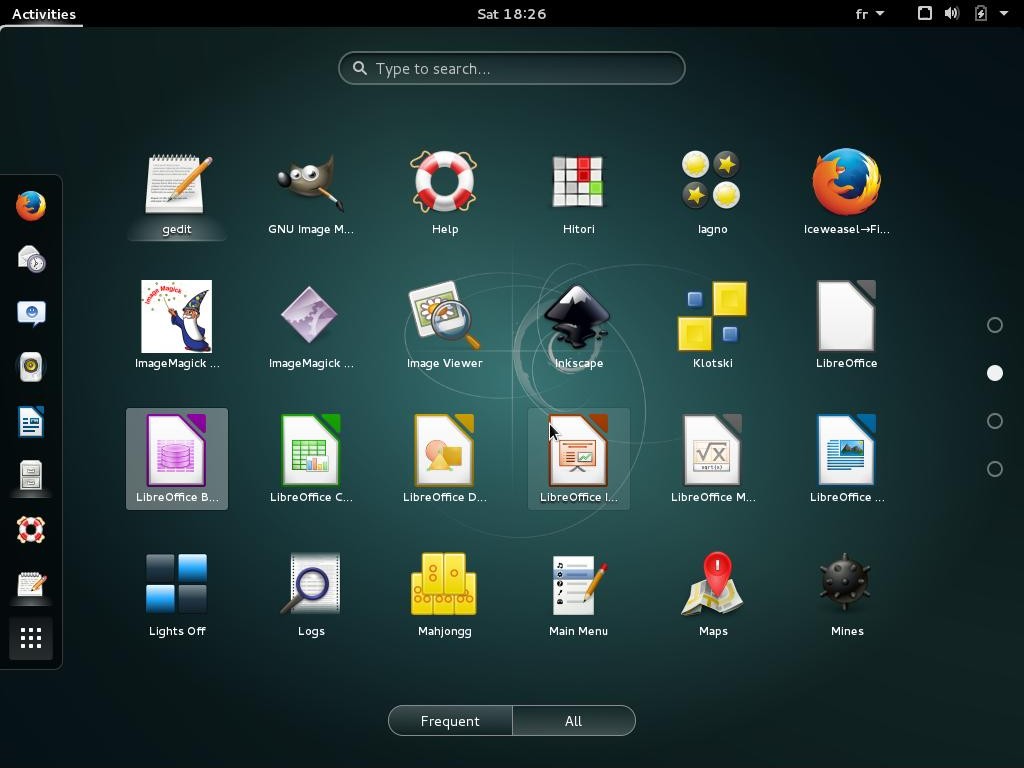
3.2.Menus
The various applications installed in your system are available through several vectors:
launchers
on the desktop, or in the
task bar
s, and more generally using the
menus
.
In the
menus, your programs are
listed and sorted by categories
. A
left-click
on the menu icon displays the application and section entries. A
left-click
on a program icon launch the corresponding application. Each desktop has its own specific menu:
3.3.Windows
Your applications, your data, your USB keys, are usually displayed within a decorated frame. Each desktop environment decorates windows its own way, but most of the times they implement the same functions:
-
the title bar at the top displays the window title and the action buttons (minimize/maximize/close)
-
the decorations around the window, which include two areas at the bottom to resize the window using a mouse left-click
-
the status area : some applications display informations at the bottom of the window (like free space available in the active partition, size of the file currently pointed at …)
-
close the window with a left-click on the cross symbol
-
move the window with a press and hold left-click and a cursor displacement (or with [Alt]+left-click)
-
resize the window with a maintened left-click on its corners (o r with [Alt]+ right-click )
You will find a detailed description of these operations in the chapter on Thunar (chap.3.6).
Hereafter an example of windows on the Gnome desktop:
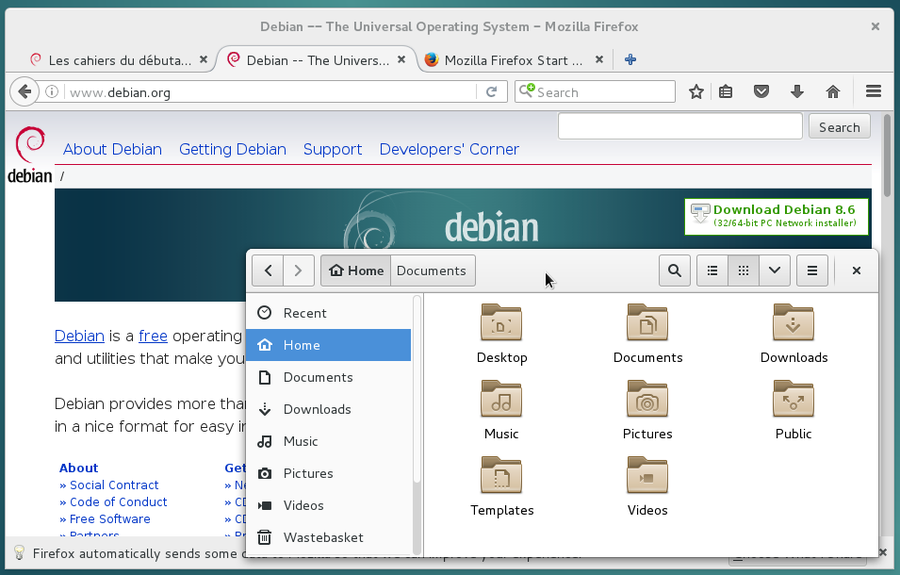
The Firefox web browser and the file manager under Gnome
3.4.Virtual desktops
To avoid overloading your workspace, the Debian GNU/Linux environments support, since several years, the virtual desktop concept: the elements displayed on your screen lay upon a "desktop". You can have several of them, which means that if you move to another "desktop", it will be empty at first. If you return back to the previous desktop, you will find it with your applications open.
 … "Several desktops" … What do you mean exactly ??
Well, it's like having
several screens
for your
computer
, lined up
behind each other
, with the capability to change their order at will. You open the Internet navigator full
screen
on the first
virtual desktop
, then you feel like having a look at your latest family pictures. So you
go to the next desktop
which happens to be empty, and you can then display there your pictures also in full
screen
mode, and return back to the first desktop and enjoy the full real estate for the comfort of your navigation.
It is also a nice mean to get
organized with your tasks
: the first desktop is reserved for the Internet applications, the second for the multimedia, the third for the office work and so on, allowing you to leave open your work in progress, for future modifications, without impacting the other activities. Each environment has its own way to represent the
virtual desktop
s:
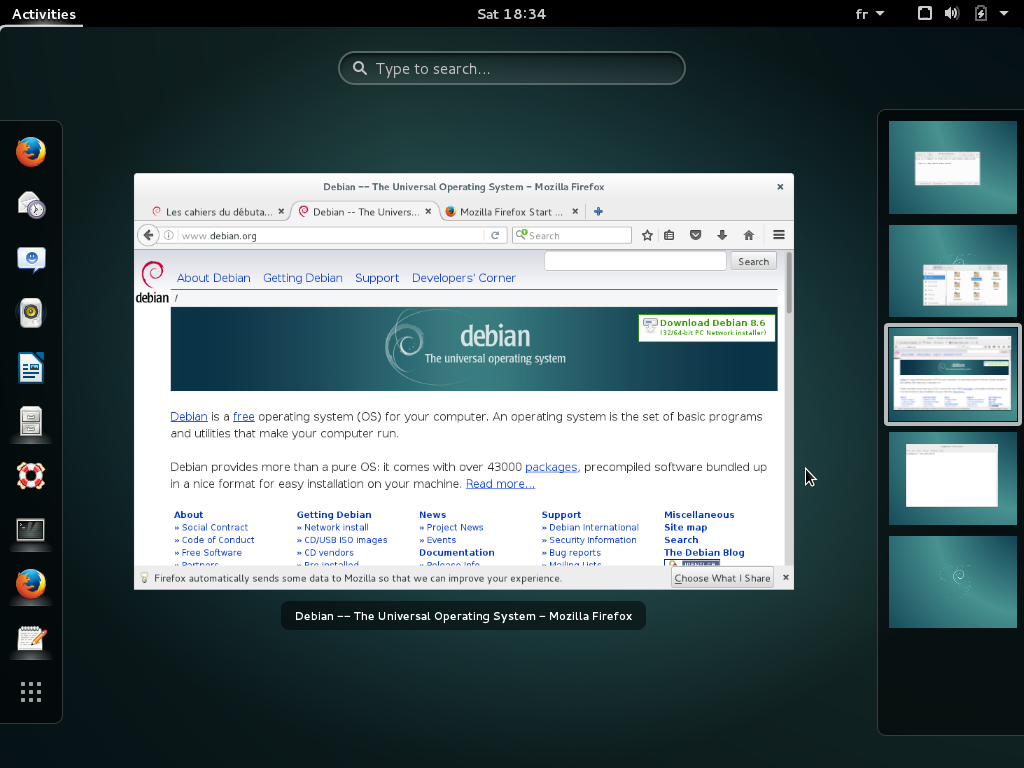
Gnome
and 5
virtual desktop
s displayed on the right
panel
-
Xfce displays the virtual desktop s in its top panel , within frame shapes representing the different workspaces.
Xfce
and 4
virtual desktop
s shown in the
panel
3.5.File management on GNU/Linux
All your data, your videos, your documents, your pictures, are regarded by Debian GNU/Linux as files, and these files are organized into folders.
Debian is an operating system (the big piece of software making your computer functional) which organizes the data according to their respective addresses, that is the path to follow, in order to access them, from the general starting point (the system root identified by the "/" symbol).
 … the picture of grandma is a "file" having an "address" relative to a "root" ???
Imagine your computer is like your house. If your favorite book is located in a certain place, this "place" is like an address relative to the "house". For example, if the book stands in the second drawer of your nightstand, one can define its address (the path to follow in order to reach it) like this: Home,bedroom,nightstand,2nd drawer,favorite book.
To separate the various "items" we use the "/" symbol, which gives the following address in computer language: /home/bedroom/nightstand/2nd drawer/favorite book.
The "root of the system is symbolized by a simple "/". The main folder containing all the users data is symbolized by "/home/, and your personal folder is named "/home/Alice/".
If we come back to the favorite book example, its address could be: "/home/Alice/Documents/books/my_favorite_book.pdf"
3.5.1.Your personal data
Your personal data are stored within your personal folder , whose address is "/home/your_ user _name". They are organized within folders to to ease the finding and consulting of the files, by yourself or by some programs (it is very logical for a photo viewer to open first in the "Pictures" folder).
To help you better organize your data, Debian is distributed with few folders already defined in your personal folder: Desktop, Documents, Downloads, Models, Music, Pictures and Videos.
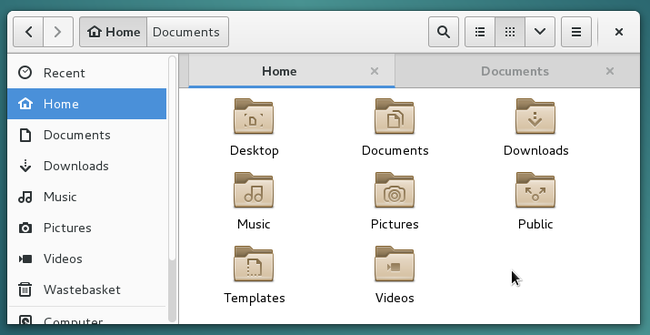
The system
file manager
Nautilus, on
Gnome
, with two open tabs
NOTE
: Most of the objects you find in the
computer
file system are either files, or folders.
In the following sections of this manual we will use the word "Item" when the distinction between "File" and "Folder" is irrelevant.
3.5.2.Your hidden files
Some items within your personal folder, relate to your interface configuration, the various fonts you are using, your passwords stored in Firefox, etc.
This type of data does not need to be always displayed on the screen when you consult your photos or documents: this is why these items are hidden .
They are identified by the form "/home/your_ user _name/.hidden_file". Please note the " . " (dot) symbol in front of the file name. When you want to display them press together [Ctrl]+h (h obviously for "hidden"), or from the menu of your file manager window goto "View" > "Show Hidden Files ":
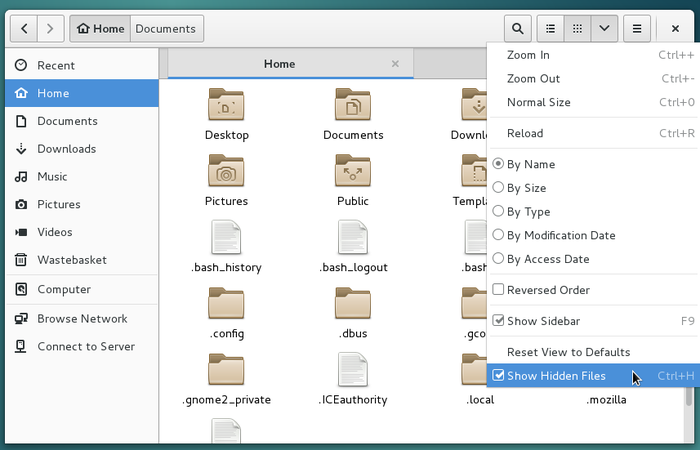
Show
hidden files
in Nautilus on
Gnome
3.5.3.System files
Debian GNU/Linux includes a collection of programs to navigate on the Internet, inside your personal folder, among all your photo albums, etc. These programs are stored inside "system folders".
These folders are write-protected and some are also read-protected: this means that you can consult some of them, but you may not modify any of them, as being a simple user . In order to modify these items, you need to use the system administrator account: "root" ( see chap.3.8.3 ).
3.6.An example of system file manager: Thunar
 Thunar
is the
file manager
by default with the
Xfce
desktop. This program let you navigate through your various folders, "Pictures", "Documents", etc. by using the
mouse
(
double-click
on a folder to look into its content) or the
keyboard
(navigate among the folders with the arrows
keys, and press [Enter] to open the selected one).The role of a
file manager
is to display on
screen
the content of these folders: your
personal data
. Thunar is accessible from the
Xfce
application menu
in the
task bar
, under the name "
file manager
".
Thunar
is the
file manager
by default with the
Xfce
desktop. This program let you navigate through your various folders, "Pictures", "Documents", etc. by using the
mouse
(
double-click
on a folder to look into its content) or the
keyboard
(navigate among the folders with the arrows
keys, and press [Enter] to open the selected one).The role of a
file manager
is to display on
screen
the content of these folders: your
personal data
. Thunar is accessible from the
Xfce
application menu
in the
task bar
, under the name "
file manager
".
3.6.1.Simplified presentation of Thunar
When Thunar displays your personal folder, a number of information and tools are already available to you:
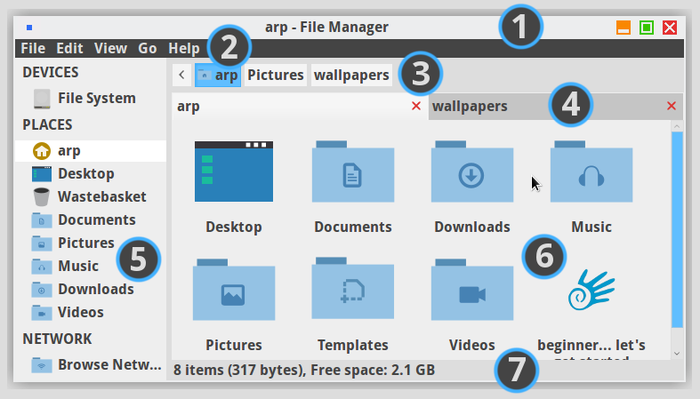
Presentation of the
file manager
Thunar
#1 The title bar : displays the folder being viewed and the program which was launched. It includes the "action buttons" allowing you, with a mouse left-click, to minimize the window (then it will be parked in the task bar ), to maximize the window (it will occupy the full screen ), to close the window or any other actions available with the window manager in use.
#2 The menu bar : each menu gives you the possibility to act on items ( copy/paste /delete/rename, etc.), to change the location, the view style (Icons, Detailed List, Compact List), and even to close the window, always with a left-click.
#3 The location bar : tells you which folder you are currently in, and, if there is enough space, the latest visited folder(s).
#4 The tab bar : tells you which folders are open in the active windows . Thunar tabs operate like those in your Internet navigator.
#5 The side pane : displays the main folders ( personal folder , wastebasket , file system, desktop), your shortcuts (favorite folders) and the external volumes ( USB keys or hard disk drives plugged as USB devices); A left-click on the label will display the selected folder. A middle-click will open the folder in a new tab (handy to copy or move data).
The side pane can also display the tree structure of your system, that is the complete set of your folders and files sorted hierarchically. You can mask/display the side pane with the keyboard shortcut [Ctrl]+b.
#6 The main pane : displays the folder content. If this folder includes other folders, they are positioned before the "simple" files (like photos, PDF documents, etc.) and, by default, sorted by alphabetic order.
#7 The status bar : display the number of items in the concerned folder,and the free remaining space in the current file system , or indicates if one or several items are selected.
3.6.2.Usage and functionality of Thunar
Thunar will let you consult your data, sort them, and modify them.
Note that other file manager s have a different look and feel (GTK3), like placing the application menu directly in the title bar (like Gnome for example).
3.6.2.1.Consulting your data
Consulting your data is very easy. Launch Thunar which opens by default on your personal folder. You can then decide to open another specific folder depending on the type of data you are looking for.
To open or explore a folder , put the mouse pointer over it: a double-click with the left button will open this folder in the same window. A middle-click will open the folder in a new window tab.
You can also click on the shortcuts located in the left side pane of the Thunar window.
To open a file , put the mouse pointer over it: a double-click with the left button will open this file with the application assigned to it by default. A right-click will display a contextual menu which, among other things, allows you to open the file with another application of your choice.
3.6.2.2.Data selection
To select several items move the mouse cursor in an empty area of the window, left-click,hold and simply move over all the items that you want selected. Then release the button. After this, you can remove one or several items from the selection using the shortcut [Ctrl]+left-click on each of them.
More details in the simplified initiation (chap.2.2.2.7).
Once selected, you can apply the modifications to these items as detailed in the "Modifications" chapter below.
3.6.2.3.Classifying the data
You are going to say: "
I can do whatever I want with my own data
" … and
you are damn right
 !
!
However some applications will access your data more easily if they are stored in their specific folders. Thus, the screen capture program will record its shots in the "Pictures" folder, the Internet navigator will record your downloaded files in the "Downloads" folder, the music player will look into the "Music" folder … And so on.
Thunar allows you to create shortcuts to ease the access, the classification and thus the retrieving of your data.
To create a shortcut , just " drag and drop " the wanted folder in the side pane. This folder will then be always accessible with a simple click.
3.6.2.4.Data modification using the contextual menu
A contextual menu shows up when right-clicking on an item (I.E. either a folder or a file), and then, let you make a number of actions/modifications on this selected item.
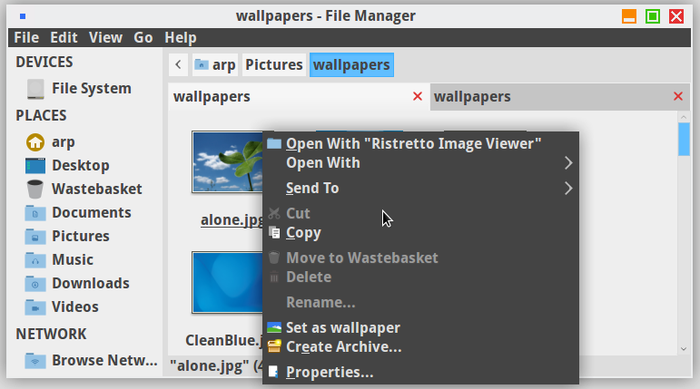
In our example the contextual menu proposes the following actions:
-
Open with the default application , here the Ristretto image viewer.
-
Open with another application: if you choose this option, another window will open and let you navigate in the system to select a different application (start searching in /usr/bin/app_name).
-
Send To is a menu to share this item via email , or create a link on the desktop, or other different actions depending on the type of item selected.
-
Cut : this action will remove the selected item with the goal of pasting it somewhere else. It is then enough to navigate into the destination folder , to make a right-click on an empty area of the window and to pick the " Paste " action in the menu.
-
Copy : this action leaves the selected item in its original folder, but let you copy (clone) it into the destination folder, following the same procedure as the one described in the "Cut" action above.
-
Move to Wastebasket : this action remove the selected item from its folder and move it directly into the Trash Bin (see next chapter)
-
Delete : definitely delete the selected item from the system.
-
Rename : this action let you modify the name of the selected item.
-
Set as wallpaper : is rather explicit and appears only if a image type file is selected.
-
Create Archive : this action allows you to compress one or several selected item(s). In the window that opens, you can choose the destination folder, by navigating in the side pane, enter a name for this archive and select its type. Then click on the "New" button to start the archive process.
-
Properties : this action let you modify the name of a file, the default application when you open it, assign an "emblem" to it or manage the access rights and " Permissions " of the selected item.
3.6.2.5.Data removal
The famous "Trash bin" (or "Wastebasket") is reachable directly from the side pane of the Thunar window. The "full bin" icon indicates that some items are currently in the wastebasket.
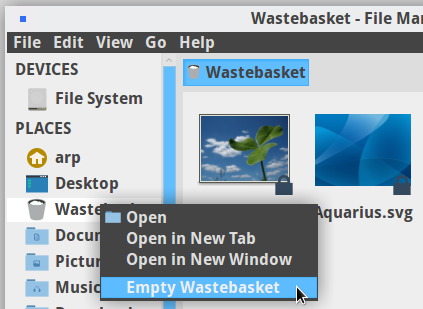
To empty the Wastebasket and remove definitively all the items in there, left-click on its proper icon and take the "Empty Wastebasket " action. You can also use the "File" menu and then click on "Empty Wastebasket ".
3.7.Rights and permissions
Debian is a multi- user GNU/Linux system. It is therefore necessary to put in place a mechanism to protect the items belonging to each user , so that user Alice could not modify the "tax & due" list of user arp , for example.
To achieve this goal, each file and each folder belongs to one owner and to one user s group .
For each item, one can give R ead, W rite and e X ecute rights distinctly to its owner, its group or all the others (I.E. persons which are neither the owner nor a member of the proprietary group).
To display these information, one can use the "ls" ( list directory content ) command, with the option "-l", within a terminal window (that you will discover in the next chapter):
ls -l
-rw-r----- 1 arp money 1794 Nov 20 14:46 tax_and_due.txt
Here, one can see that the user arp has the " r ead" and " w rite" rights , on the file 'tax_and_due.txt', while the members of the money group (which user Alice is part of) can only " r ead" this file, but not modify it, and the others cannot even open it (" - ", means no right).
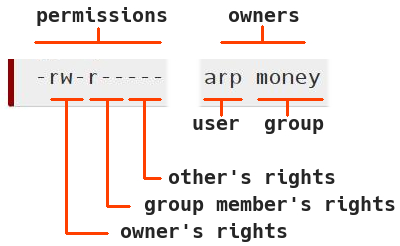
Note that the first position in the permission string is reserved for the file type indicator.
3.7.1.Rights and permissions from the contextual menu
The file managers integrated in the various Debian desktops let you also display and/or modify the rights and permissions of your system folders and files "with the mouse only"  . To do so, you need to open the contextual menu with a right-click on the file/folder you are interested in, and click on "Properties":
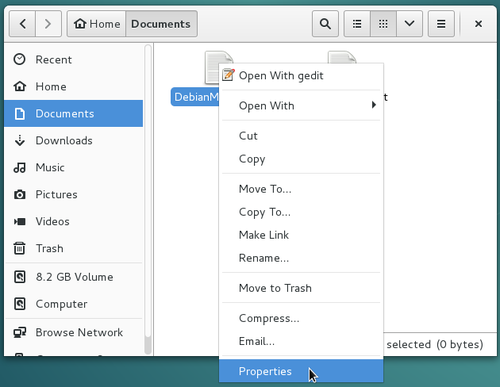
In the new window which opens, click on the "Permissions" tab:
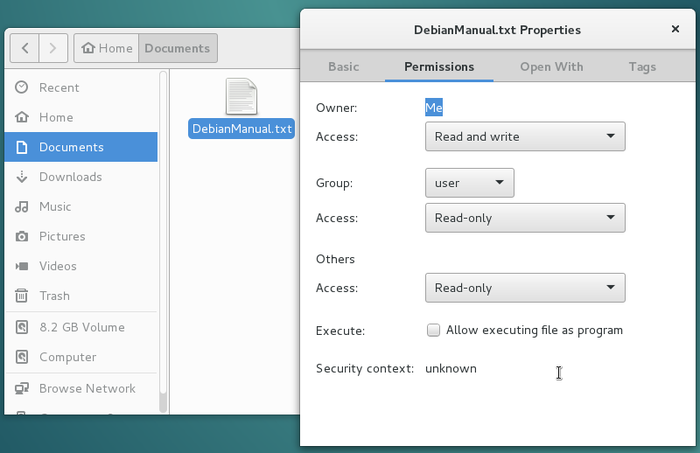
Edition of
rights
and
permissions
from the
contextual menu
In this example, the file belongs to "Me" (arpinux), who has the Read and Write access, while the other users or groups have a Read only access right.
3.8.The terminal
 When you launch an application from the menu, or when you move a file from a folder to another by using your mouse, you send instructions to your computer in graphical mode.
These instructions can also be sent directly, without going trough a menu or launching an application, thanks to the Terminal which gives you access to the command line . This tool is more accurate than the graphical interface because it let you use all the options available in your application. It is also your last resort when the graphical session is gone.
The only concern is that this little black box, full of strange signs, is somewhat frightening … But we are going to demystify all this and show you that the terminal can become your new friend  .
.
In case of doubts, don't hesitate to ask your questions on the support and help forums (chap.1.5).
 Never run
terminal
tests in
administrator
mode !!
: some very useful commands like "rm" (
r
e
m
ove) allow you to bypass the "
wastebasket
" principle, but could be devastating on the entire system when you are running them in
administrator
mode.
Never run
terminal
tests in
administrator
mode !!
: some very useful commands like "rm" (
r
e
m
ove) allow you to bypass the "
wastebasket
" principle, but could be devastating on the entire system when you are running them in
administrator
mode.

Geek girl, by Péhä (CC-BY-SA)
3.8.1.Presentation
Let's simply start with what you see written in the terminal window:

-
the user , its you, or more exactly the one who is logged in and uses the terminal
-
the host name , is the name of the machine on your local network, a name you entered during the system installation
-
the path is the place where you are currently in the file system (here the personal folder '/home/arp/' symbolized by the tilde "~")
-
the prompt delimiter (symbolized here by the "$" sign) after which you will enter in the command line . Its output (or "feed back") will be displayed on the following line(s) of the terminal .
The configuration of the full prompt string resides in the '~/.bashrc' (hidden file in your personal folder) "bash" interpreter configuration file. The bash program is handling the commands entered in the terminal (to make a long story short); it enables you to send commands, typed in the terminal, to the computer system in order to give it various instructions or obtain some information back.
3.8.2.User mode example
To tame the beast, we are going to start with a simple "cd" (standing for " c hange d irectory"), which let you walk through the system file.
When you open a Terminal, you are by default in the personal folder of the user logged-in (here it is the /home/arp/home folder). This folder includes the sub-folders Pictures, Downloads, etc.
To go down into the 'Pictures' sub-folder, I type in the words "cd Pictures" - without the quotes - (and the uppercase is of importance here, hence the necessity to clearly identify the item names one is looking at …) then I press [Enter] to send the command. To reach this 'Pictures' folder from anywhere in the file system, you need to provide its full path '/home/arp/Pictures' (replace arp by your user name):

Using "cd" to navigate the file system in the
Terminal
console
You can see here that, within the command prompt prefix, the path "~" has been changed to "~Pictures" , because you changed the folder you were in, and this is exactly like opening a folder with your graphical file manager .
However, when you open a folder with the file manager, you "see" all the items in there. Within a terminal you need to list the items with the "ls" command:
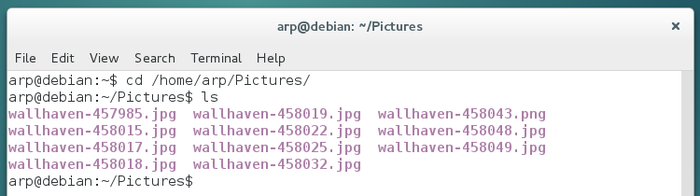
List of existing folders and files with "ls"
… easy, isn't it ? See, you did not break anything  . Yes, but you are going to tell me that this stuff is rather useless …
OK, lets move on to cooler commands:
-
' uname -r ' gives the version of the active Linux kernel.

-
' uptime ' gives the current time, since how long the system is running, how many user s are currently logged in, the system load average for the past 1, 5, 15 minutes, in order to see if the process waiting list is not too long. If the load is over 1 (for old computers ) or 2 (for dual-cores and +) this means that one process is running while another one is waiting.


3.8.3.Administrator mode example
To run a command as administrator , Debian uses the command " su ". You will be asked to enter the administrator password , and nothing is displayed on screen when you type it in. This is done on purpose.
Debian can also use " sudo " (do as super user ). When using sudo , you will be asked, this time, to enter your own password .

Switch to
administrator
mode with 'su'
You note that the " $ " sign (the command prompt delimiter), as been replaced by the " # " sign, indicating the " root " administrator account.
Once connected as "root" in the terminal session, you can launch system administration commands, for example here, a package repository update within a Gnome terminal, using the command "apt-get update":
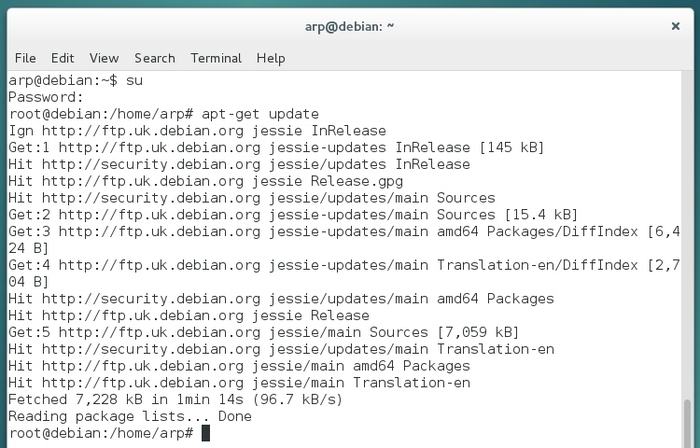
Terminal
in
administrator
mode: package list update using "apt-get update"
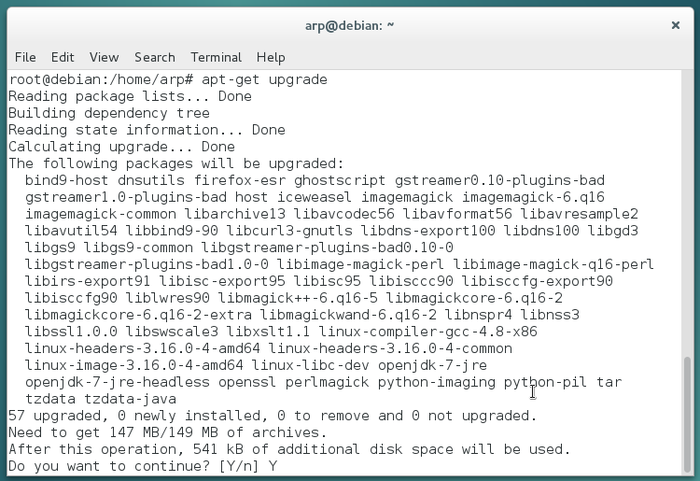
Look again at this package list update example, that is the retrieval of the latest information on packages and potential updates. After the completion of this package list update (verifying the repositories), we launch "apt-get upgrade" to execute the available updates for the software you have installed.
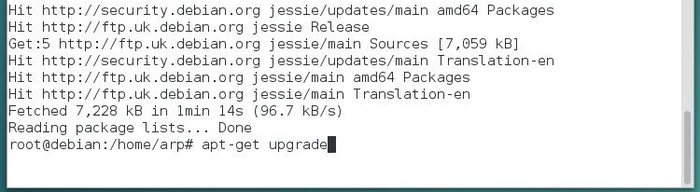
Terminal
in
administrator
mode: package update using "apt-get upgrade"
On Gnu/Linux, when a process must modify the system, it usually asks you a confirmation. Here the terminal informs you about the type of the expected changes and wait for your agreement, either by simply pressing [Enter] if you accept the default option (here "Yes") or by typing "y" to accept or "n" to decline.
Terminal
in
administrator
mode: Confirmation of the update
If you accept the changes, you will see the complete process of downloading, configuring and installing the concerned packages. Then the terminal will "give the control back to you" by displaying the command prompt:
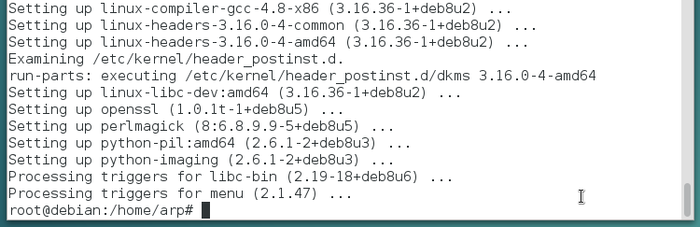
Terminal
in
administrator
mode: executing the update
That's it, you just updated your system using the terminal  !
!
The single commands tend to be boring after a while … But then it is a lot more fun if you associate several of them together in a " script ", which enables the automation of series of processes.
For more information on script s, and if you want to "learn the shell", see the dedicated page on linuxcommand.org: http://linuxcommand.org/lc3_learning_the_shell.php .
A short summary of the GNU/Linux commands is proposed at the end of this manual (chap.11).
 You must be extremely strict when you send commands in
administrator
mode. To avoid errors, use the
auto-completion
feature. This mechanism allows the
computer
to complete the commands you started typing (3 characters are enough), or their corresponding arguments. This is accomplished by pressing on the [Tab] key. If several choices are possible, they will be proposed to you as well.
You must be extremely strict when you send commands in
administrator
mode. To avoid errors, use the
auto-completion
feature. This mechanism allows the
computer
to complete the commands you started typing (3 characters are enough), or their corresponding arguments. This is accomplished by pressing on the [Tab] key. If several choices are possible, they will be proposed to you as well.
Some applications in graphical mode require the administrator rights . You should not launch them with su or sudo , otherwise that might break the graphical session. You should use instead the command gksu (on gtk type desktops) or kdesu (for KDE) depending on your desktop environment .
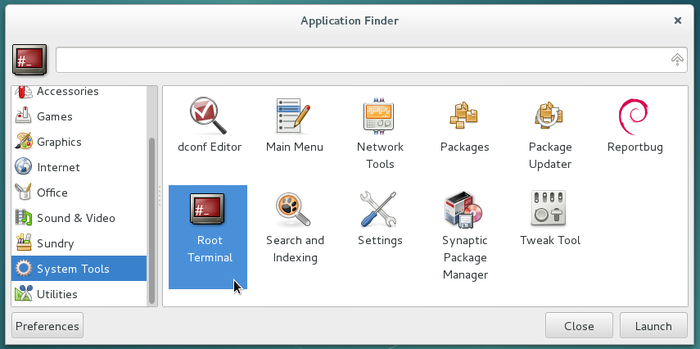
3.8.4.Launching an "administrator terminal"
Like you have seen in the previous section, one uses " su " (or " sudo ") in a terminal to enter a command in administrator mode. You can also launch directly your terminal in " administrator " mode using a menu entry or the application list :
 Be aware that within this kind of terminal, all the commands entered are executed with the "root" account, and in case of mistake or cockpit error, the system can become unstable. None of the commands used in this manual requires to be identified as "root", except when clearly otherwise indicated.