 5.Installing Debian
About time to take the plunge …
The following sections describe the two modes of the classical installation:
-
Single-boot installation : Debian will be the only distribution residing on your hard disk and the install process will be automatic (assisted partition ing, with the whole Debian system in a single partition ).
-
Dual-boot installation : Debian will be installed next to another system (GNU/Linux or Windows®) in automatic mode (assisted partition ing of the free space, with the whole Debian system in a single partition ).
 This manual is intended for
beginner
s
, and does not cover all the install capabilities of the Debian system. If you are in a particular situation not covered here, look at the on-line Debian installation manual
47
.
This manual is intended for
beginner
s
, and does not cover all the install capabilities of the Debian system. If you are in a particular situation not covered here, look at the on-line Debian installation manual
47
.
For installations in a different context (separated /home
partition
, Logical Volume Management,
Encryption
, Multi-boot, etc.) you will find the links to the specific documentations
in chapter 5.5
.
5.1.Before installing
Most of the users never had to install a system previously (computers are usualy delivered with an operating system already installed) … And that could be a little freaking … Take the time to be well prepared, take a breath of fresh air, and everything is going to be all right  .
.
5.1.1.Hardware compatibility
One of the first question when you wish to install Debian concerns the hardware
compatibility
:
is Debian going to run smoothly on my
computer
??
A fast and simple way to check this out, is to type "Debian" followed by your machine type, within your favorite search engine: look for "Debian IBM T60", for example. In case of doubts, don't hesitate to ask on a support-and-help forum (chap.1.5).
In order to be really sure, you can use a distribution offering a test capability through a " live " session, like Debian live (chap.5.2.1.4).
5.1.2.Backing up your data
If you anticipate to overwrite your hard disk with Debian, verify first that none of your personal data is in there: everything will be lost.
Also, if you anticipate to install Debian in "dual-boot" mode, next to another system, remember to back-up your data before you start messing with the partitions:
5.1.3.Disk space requirement
A Debian distribution occupies 4 GB in average, but you should still plan for a minimum of 6GB, to be able to download the updates. For greater safety and if you plan to add few applications, reserve 12 GB and you will be comfortable.
5.1.4.Installation time duration
To install Debian from a "net-install" ISO requires some time because the software is downloaded from the Debian servers during the process: the time duration needed for the installation then depends on the speed and quality of your Internet connexion and may vary from 40 up to 90 minutes.
To install a derivative or from a Debian Live support, takes far less time (around 20 minutes, depending on your computer power), because the packages are already included within the downloaded ISO image. However, a system update will then be necessary after the installation, because the embedded packages are dating back to the time when the ISO image was burned.
5.1.5.Preparing the hard disk
If you anticipate to install Debian as the unique operating system on your machine, you don't have to do anything special: the embedded installer includes the tools needed to prepare (I.E. to format) the disk(s)
If you anticipate to install Debian next to another operating system , take good care of preparing your hard disk (like defrag menting the Windows ® partition for example). More details in the section dedicated to Dual-Boot (chap.5.4).
5.2.Downloading Debian
Debian ISO images are available for each desktop, in several architecture declinations, and supported by various media like netinst, CD, DVD, …
5.2.1.Which image to download?
Here after the different ways to obtain a Debian ISO image. If you have other questions, read the Debian FA Q: https://www.debian.org/CD/faq/index.en.html
5.2.1.1.Debian Netinst
If your Internet connection is stable, we encourage you to download an ISO image of type "netinst" multi-arch which includes everything you need to install Debian on any modern 32 or 64 bits (i386 or amd64) computer, with all the desired options: you will be able choose your main interface during the installation process. This is the ISO image used in the installation section of this manual.
To get hold of the "Netinst" ISO image, you can visit this page: https://www.debian.org/CD/netinst/index.en.html . You will find there the torrent links (to share and relieve the main servers) and the direct "HTTP" to the ISO images depending on your architecture . Below the torrent link to a 64 bits ISO image:

5.2.1.2.Debian on CD/DVD
To obtain a classic bootable ISO image, pre-configured with a specific desktop, you can look at this page: https://www.debian.org/CD/http-ftp/index.en.html .
This ISO file does not let you test your system, through a "live" session, to check the hardware compatibility with your PC.
It only allows to install Debian on your computer, which is already cool, and let you install directly your preferred desktop, without a stable Internet connection at your disposal  .
.
5.2.1.3.Debian torrent
To relieve the main Debian servers and, at the same time, share your ISO image with other community members, you can use the BitTorent48 protocol.
To obtain the list of the available "torrents", you can visit this page: https://www.debian.org/CD/torrent-cd/index.en.html .
5.2.1.4.Debian Live
Other images, called "autonomous", are also available: they let you check your particular environment through a " live " session. They include also an installation launcher on the desktop, which, once your test is completed, let you install Debian directly from the session you are in. To get hold of a live image, you can visit this page: https://www.debian.org/CD/live/index.en.html .
 The principle of the
Live
CD
is the capability to use/test a distribution on a
computer
without any risks for your
personal data
. The
Live
also let you check the distribution
compatibility
with your hardware.
The principle of the
Live
CD
is the capability to use/test a distribution on a
computer
without any risks for your
personal data
. The
Live
also let you check the distribution
compatibility
with your hardware.
The Debian
software
is "compressed" within a special file (the 'squashfs.filesystem' file) and embedded in the downloaded ISO image. This same special file is "uncompressed" during the
Live
utilization, and will later be copied on your hard disk during the installation process.
5.2.2.Verifying the ISO image integrity
In order to verify the integrity of the image, Debian computes the " md5sum " (short form of "md5 check sum"). This check can be used on all kind of data, but is particularly useful when downloading ISO image.
5.2.2.1.Checking md5 on GNU/Linux
The md5 checking tool is integrated in almost all the GNU/Linux distributions. To verify the md5 checksum of a file, just type the following command in a terminal emulator, including the path of the file to be checked:
md5sum debian-xx-amd64-i386-netinst.iso
which will return a result of the type:
6753c353cef5f5336079d94562ad15c3 debian-xx-amd64-i386-netinst.iso
to be checked against the md5sum given by the download site.
Verification in graphic mode ("with the mouse").
The Gtkhash program let you also check the md5 signature, but with a graphical interface.
-
Install 'gtkhash' (using a Terminal command or the Synaptic package manager).
-
In the File field: look for the ISO file to be checked.
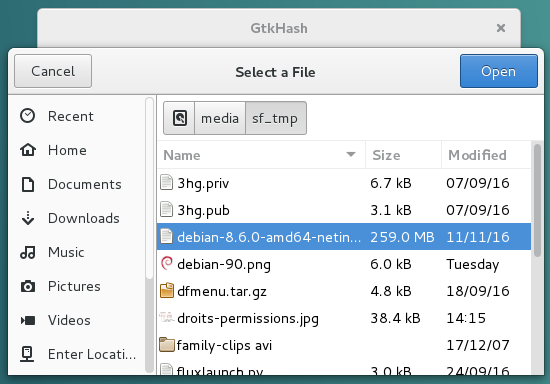
GTKHash: selecting the ISO image file to be checked
-
In the Check field: paste the checksum retrieved from the Internet site.
-
Click on the Hash button.
-
The digital fingerprints (I.E. checksums) will show-up for each hash functions (MD5, SHA1, SHA256,…)
-
If the integrity checksum is exactly matching, a (green) validation symbol will be displayed at the right of the field, and in the corresponding one in the computed hash field.
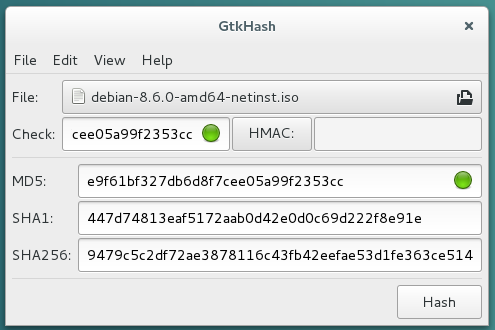
GTKHash: verifying the md5 checksum
5.2.2.2.Verifying md5 on Windows®
To graphically verify the md5 checksum using a Windows® PC, you can use the WinMd5Sum software , to be downloaded here: http://www.nullriver.com/downloads/Install-win Md5Sum .exe
Once installed, launch it. A small graphical interface is open. In the "File Name" field paste or open the Debian image.iso downloaded file. In the "Compare" field, make a copy/paste of the md5 checksum retrieved from the site given by Debian (see above) and click on the "Compare" button.
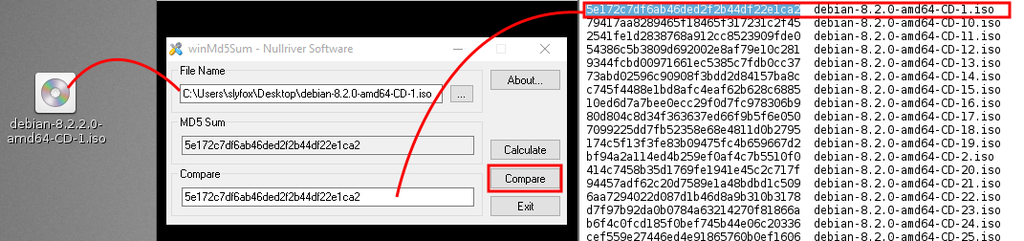
the winMd5Sum
software
in action on a Debian ISO image
That's all. The md5 checksum is computed within a minute or so (depending on the size of the file) and if found to be correct, you can proceed to the next step.
5.2.3.ISO transfer on a CD/DVD
 To burn your Debian ISO on a CD/DVD on a computer under GNU/Linux, simply open your favorite burning application, indicate the path of the 'debian-xx-iso' downloaded file, and start the media burning.
For the Microsoft® user s, read this tutorial made for the Windows®7/8 systems: http://www.digitalcitizen.life/burning-iso-or-img-disk-images-windows-7
5.2.4.ISO transfer on a USB key
 The USB key is the most convenient way to install GNU/Linux distributions, because you can change them as often as you want and even test several of them in parallel.
The key also secures your tests because once the session is over, no trace is left on the key nor on the computer which booted from it  .
.
5.2.4.1.From a GNU/Linux system
With a terminal : the recommended method.
Plug your USB key in and launch a terminal in "root" administrator mode ( see chap.3.8.3 ). We are going to identify the USB key to be used, with the command:
blkid
which returns information of this type:
/dev/sda1: LABEL="system" UUID="3d378712-1b6e-4f66-b9e8-2a6673c62199" TYPE="ext4"
/dev/sdb1: UUID="F9B8-E691" TYPE="vfat"
Here, our key is identified as UUID="F9B8-E691", is formated in "vfat" and includes the sdb1 partition . Note carefully this sdb1 value, to avoid erasing by mistake a partition on your internal hard disk (here sda1 is another partiton on this disk).
The Debian ISO file should be located in the Downloads folder. Let's move in there to act on this ISO file (the "$Home" variable replaces the address "/home/your_loginID"):
cd /$HOME/Downloads
Now, we are going to transfer the ISO content to the
USB
key, thanks to the "
dd
" command.
Take good care of naming the
USB
key "
sdb
"
and not "
sdb1
"
(in our example), because it is the disk device name which is requested, not the
partition
, and don't forget to change the
xx
in the 'debian-xx.iso' file by the corresponding version number.
Within a
terminal
in "root"
administrator
mode (
see chap.3.8.3
):
dd if=debian-xx.iso of=/dev/sdb bs=4M && sync
The transfer duration on the USB key is obviously depending on the size of the ISO and on the transfer rate of your USB port. This operation usually lasts from 10 to 15 minutes without any sign of activity within the terminal window. Once the transfer is completed, the control will be given back to you, that is a new command prompt line will be displayed in the terminal.
With liveUSBcreator: the graphical way
Thuban and coyotus have made a littel graphic tool to transfer ISO image to an USBkey easily. LiveUSBcreator is available in binary package here: https://lescahiersdudebutant.fr/tools/
-
launch : liveUSBcreator is launched from the Applications List or menu, "System" section
-
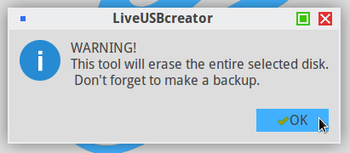
warning : the scary message:
-
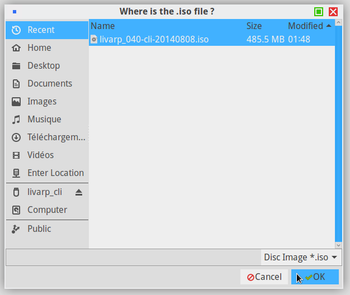
where is the ISO : first, you have to choose the ISO file to transfer:
-
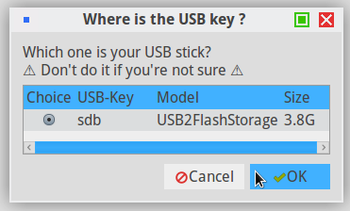
where is the USBkey : select the removable drive to copy the ISO to. WARNING : liveUSBcreator will rease all the datas on the USB to copy the ISO file. If doubts, take a screenshot then come to a support forum (chap.1.5).
-
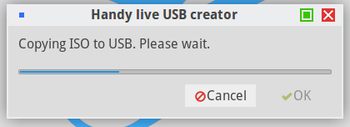
copying ISO : if you checked the previous step, the transfer begins. You can follow whole process. A message will be displayed when your USB live is ready to use:
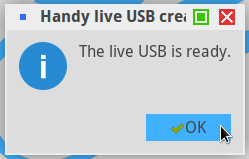
You can now use this USBkey to start
installing Debian
(chap.5)
 !
!
5.2.4.2.Using Rufus on a Windows® PC
Rufus is a software utility allowing you to format and create bootable USB mediums, like USB keys, Flash memories, etc …
This software is recommended to transfer ISO from a Windows® PC.
All data on this key will be erased by Rufus. If you have important data in there, we strongly suggest you copy them immediately on another medium.
-
Download the Rufus software from the dedicated page: https://rufus.akeo.ie/ .
-
Launch Rufus and fill the fields in like this:
-
"Device": select the USB key ready to receive the new distribution.
-
"Partition scheme and target system type": select the option "MBR partition scheme for for BIOS or UEFI"
-
"File system": leave the option "Large FAT32" (Default)".
-
"Cluster size": leave the option "xxx kilobytes (Default)".
-
"New volume label": enter, for example, "Install Debian GNU/Linux".
-
"Create a bootable disk using": select the option "ISO Image" (if you did download an ISO file, which is usually the case).
-
Click on the CD icon and pick the ISO file recently downloaded.
-
Tick the options "Quick format", "Create a bootable disk", "Add extended label and icon files"
-
Click on the "Start" button to launch the process.
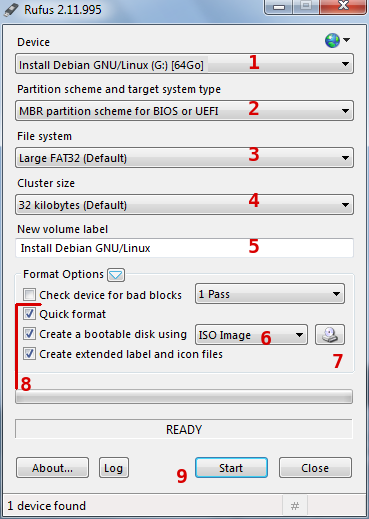
Wait for a little while, and you will have at your disposal, a brand new Debian bootable USB key !
You just need to reboot your computer from this bootable key, and launch the installation.
5.2.5.Booting from the CD/DVD or the USB device
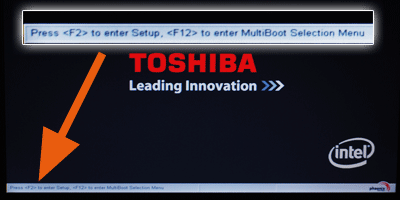
To proceed now with the Debian installation, using your CD/DVD or USB medium, you need to ask the computer to boot from this device. If your computer does not boot automatically from the desired installation medium, you need to access the "Boot menu" or modify the "Boot order" in the BIOS.
Some computers have a function key that let you boot directly from a peripheral device, without having to modify the BIOS parameters. Usually, but not always, pressing the F12 key at start-up gives you access directly to the boot options. On the other end, to access the BIOS configuration you need to tap one key like DEL, ESC or F2 during the start-up phase.
More information at: http://www.boot-disk.com/boot_priority.htm
5.2.5.1.The Boot Menu
As mentioned above, the key to access the Boot Menu at start-up may vary from one computer to another. This specific key as well as the key to access the BIOS configuration is usually indicated during the boot sequence for one or two second (more details at howtogeek49)

The boot menu let you select the boot peripheral without going into the BIOS configuration
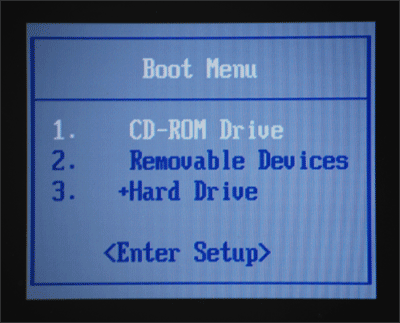
Use the keyboard direction arrows to select the right peripheral (in this example the USB key is the "Removable Devices").
5.2.5.2.BIOS configuration
If the Boot-order menu is not available, you must modify the Boot priority inside the BIOS.
Once entered in the BIOS settings, the operations to execute are very simple, but you should be extremely careful to not modify other parameters. Hopefully, in case of mistake, the program let you quit without recording the changes, by pressing the ESC (or Escape) key. Other keys like F9 or F10 will let you reload the default parameters, or to record the changes before quitting:
-
F9 : reload default parameter (or factory setting)
-
F10 : Record the modifications and quit
-
ESC : cancel the modifications and quit.
The navigation is done by using the directional arrows on the keyboard . One validate or enter inside an option using the ENTER key. In most of the BIOS models, you move until the Boot menu is highlighted, then find the peripheral selection for the boot (boot device, boor sequence, boot priority) and finally put the various devices in the first, second, third etc … positions, reflecting the boot order you wish.
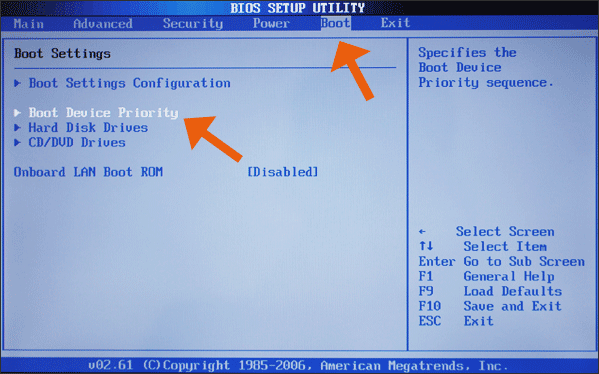
BIOS
: reaching the Boot Device Priority menu
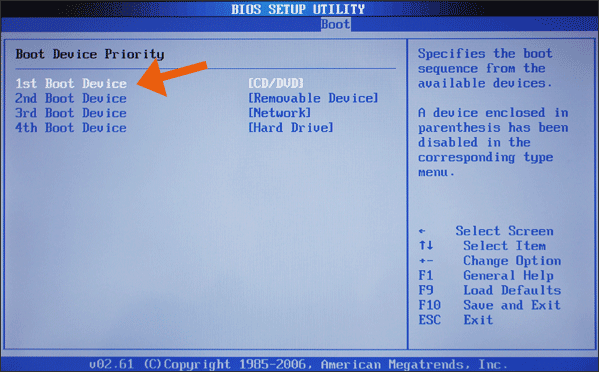
Hereafter some peripheral names, like they might appear in your BIOS settings:
-
A Cd-Rom reader will usually appear as CD/DVD or CD-ROM
-
A Hard disk will usually appear as HDD or HARD DRIVE or HARD DISK or even IDE~ …
-
A USB peripheral will usually appear as USB DRIVE or USB DEVICE or Removable Device .
5.2.5.3.BIOS/UEFI/Secure Boot configuration
If your machine uses a BIOS/UEFI equipped with the wonderful "Secure Boot", the handling is slightly different.
Each manufacturer has its own UEFI, and the following images and explanations might be different at your place.
Using the mouse or the navigation arrow keys, select the "Security" or "Authentification" tab. Verify that the "Secure Boot" is "Disabled".

SecureBoot: Disabling this option
Change the boot order
Now we must change the boot order so that the computer starts first from the USB (or the DVD). Click on the "Boot" tab and modify the order, if necessary, so that your medium becomes the first of the list.
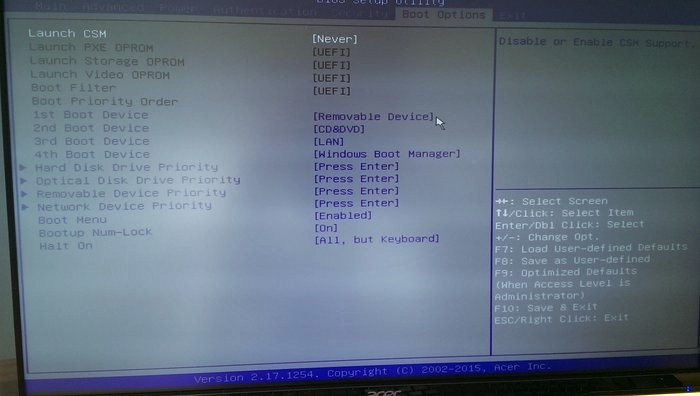
SecureBoot: Boot order setting
Now, you save your changes and you start the Debian installation.
5.3.Single-boot installation
 Here comes the long-awaited moment, the actual installation of the Debian GNU/Linux system on your machine … Are you ready to begin the journey ?
Hereafter a visual step by step explanation on how to easily install Debian, using the graphical installer. This method erases the whole disk and installs Debian as the unique operating system on your machine. The ISO image is of the type "netinst".
The Debian installer displays an explanation at every step of the process: with GNU/Linux  there is no advertising, so please take few seconds of your time to read the little messages which talk about your future system
  .
.
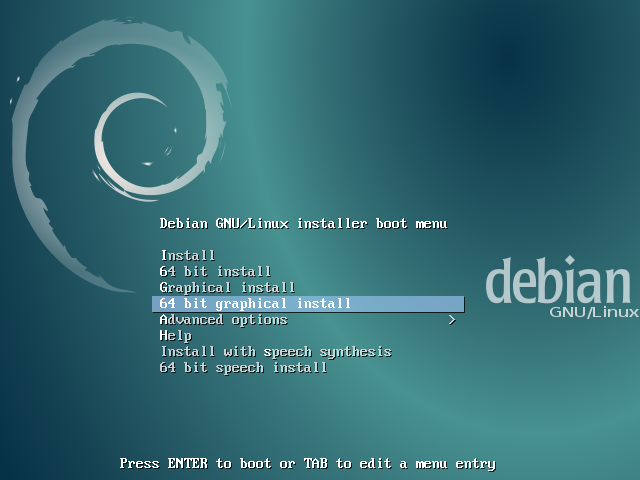
5.3.1.Starting the installation
When the installer begins, we select the installation mode:
If your motherboard boots under UEFI, the display might be slightly different:
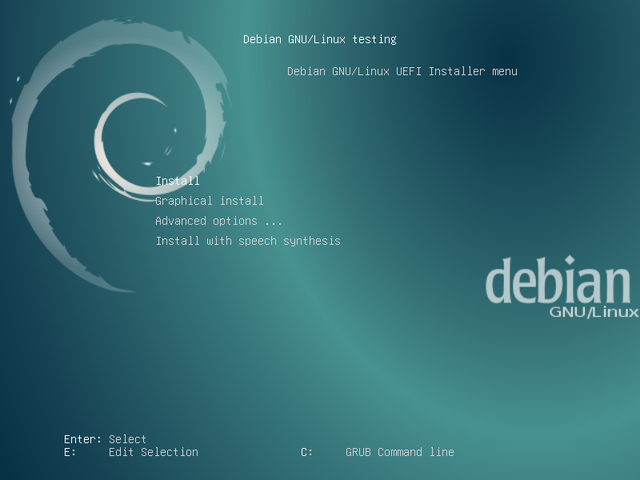
More information on UEFI in the Debian wiki50.
During the start-up, the installer proposes a choice of several installation modes:
-
The Install mode proposes a text in gray color on a blue background, and cursor move possible only by using the keyboard arrows, the TAB key and the Space bar to tick options on/off.
-
The Graphical Install mode offers a prettier interface, enabling the mouse usage.
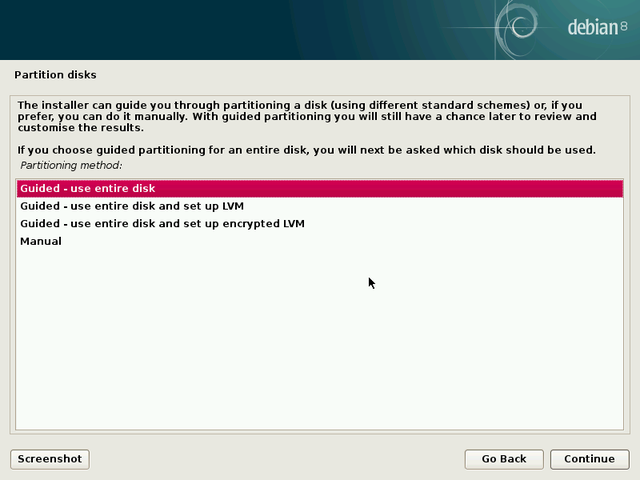
Each installer pane displays a clear explanation message. When you don't know the answer, take the default setting. However, pay great attention during the partitioning phase, since this operation could erase the existing data on your hard disk(s).
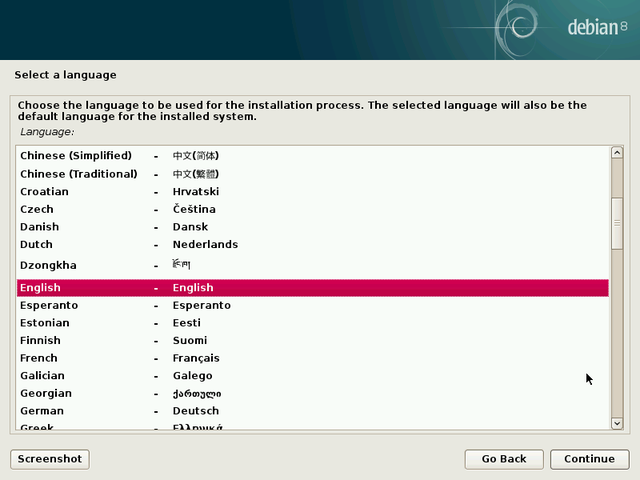
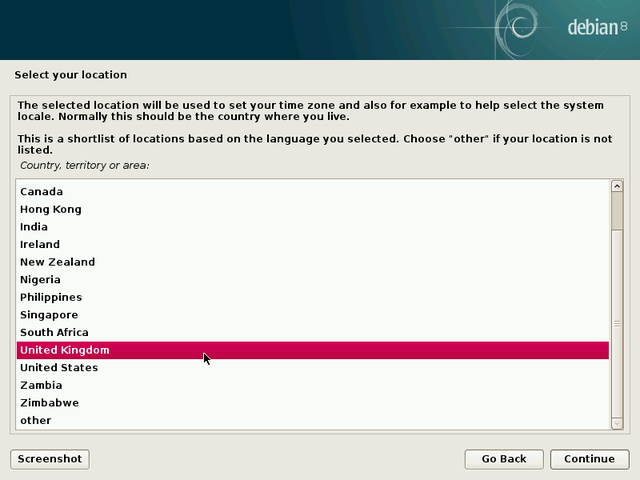
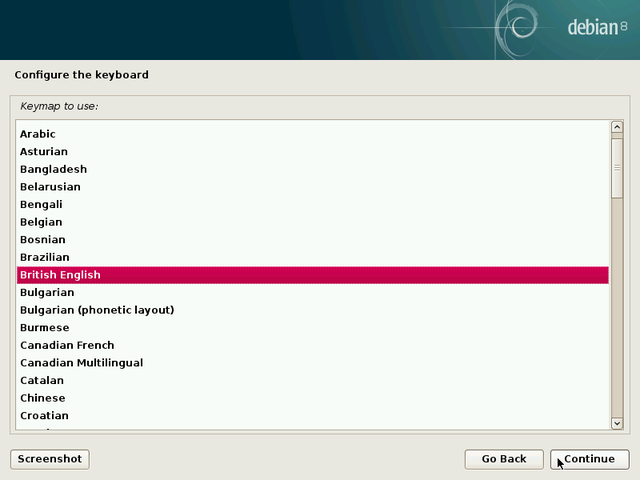
5.3.2.Selecting your language and your geographical location
5.3.2.1.Select your language
Selection of the system language by default: this choice will also modify the installer language itself, which then will display its own messages in English (if you chose "English").
5.3.2.2.Select your geographical location
This information allows the system to automatically set the date and time of your system, using a remote time server.
5.3.2.3.Configure your keyboard
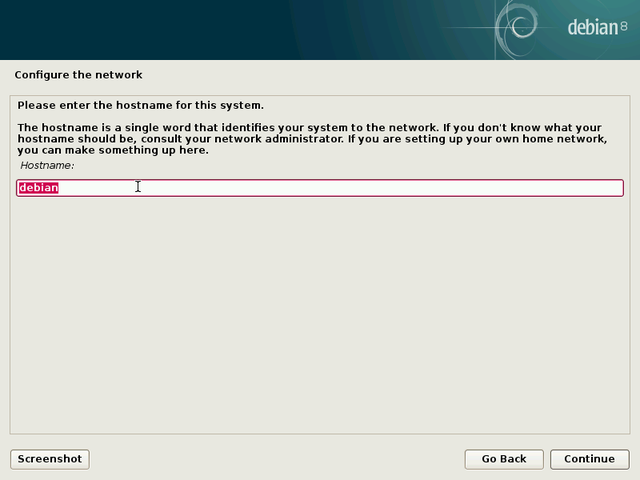
5.3.3.Network configuration
5.3.3.1.System name setting
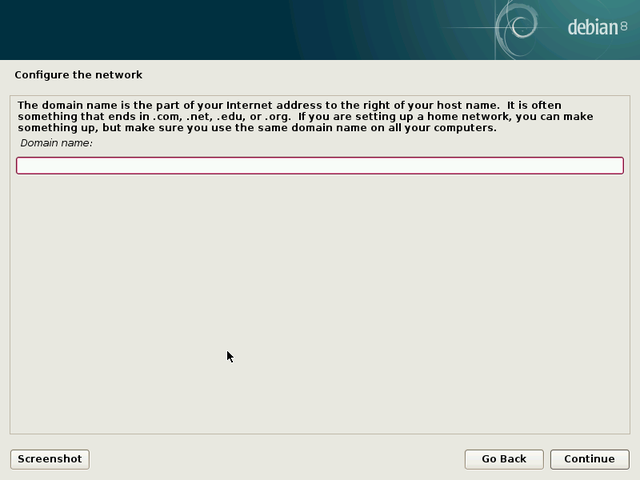
5.3.3.2.Domain name setting (if necessary)
Leave this field empty if you don't know the answer.
5.3.4.Creating User accounts
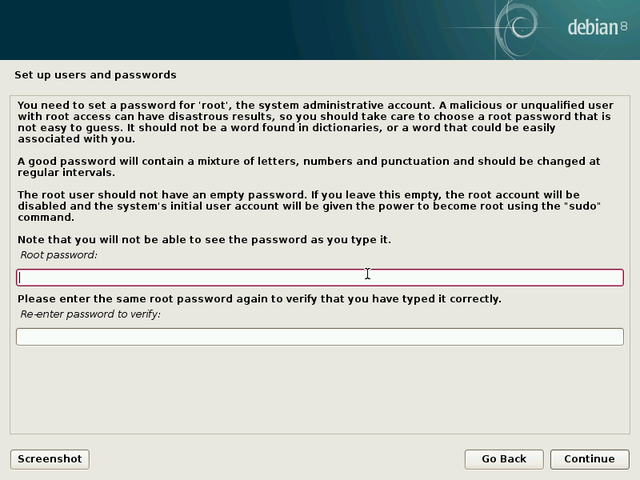
5.3.4.1.Root account creation
Enter the administrator password (twice to confirm). Like indicated in the information message, creating a "root" administrator account is not mandatory. If you leave the fields empty, the first user will receive all the rights (from the ancestral brain of the omniscient power … "sudo")
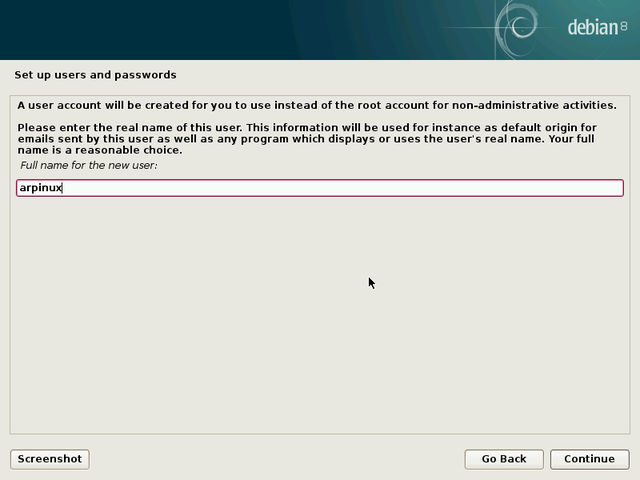
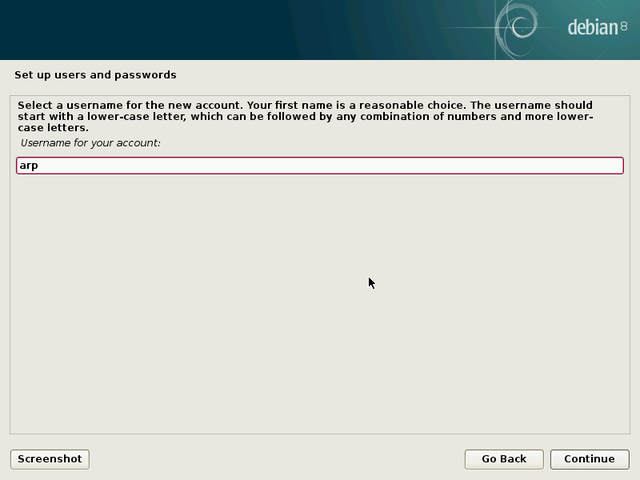
5.3.4.2.First user account creation
Start by entering the full name of the main user:
Then enter its identifier: the pseudo which will be used during the connection ( login ) to a session:
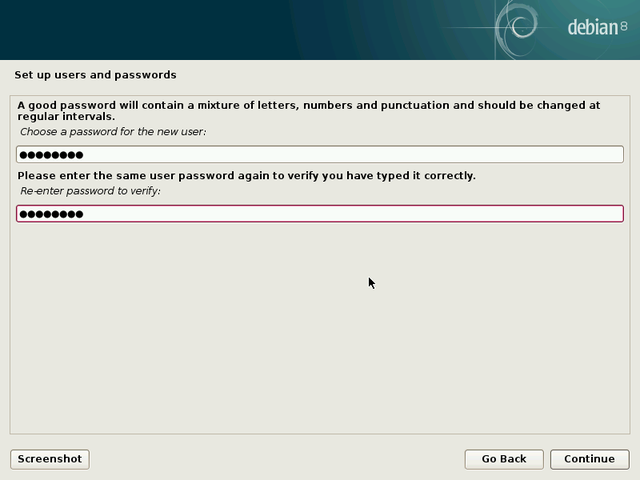
5.3.4.3.First user password setting
Like for the administrator account, you need to enter the password twice for confirmation.
5.3.5.Hard disk partitioning to receive the installation
 … "
Partition
ing" … What's that ?
… "
Partition
ing" … What's that ?
The partitioning process consists in organizing different partitions on your system. Partitions are non-overlapping area defined on your hard disk(s), each one of them having its specific properties (file system type, unique identifier, size, etc.). Inorder to function correctly, Debian GNU/Linux needs at least one partition to install the operating system. An additional exchange partition (called SWAP) is highly recommended, to deal not only with insufficient memory space, but also with the suspend or hibernation functionality.
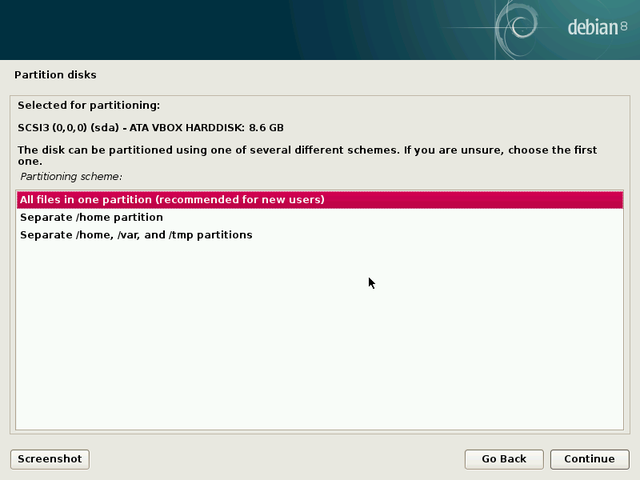
The guided partitioning scheme proposes 2 partitions (system + swap), but you can opt for a scheme proposing a separated "/home" partition, and use another hard disk to store your personal data (as an example).
5.3.5.1.Selecting the guided or manual partitioning scheme
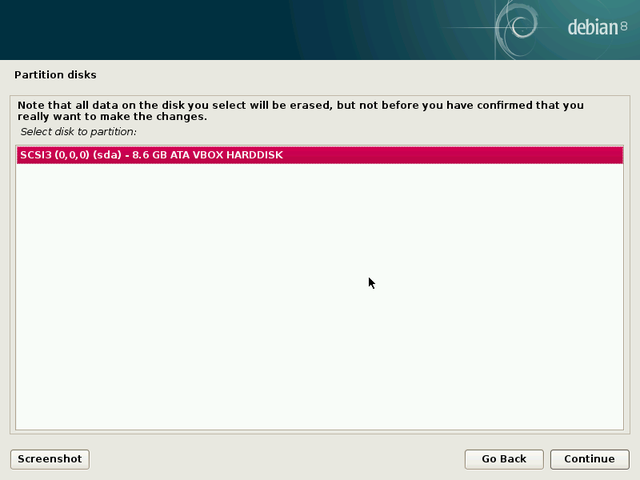
5.3.5.2.Selecting the disk to partition
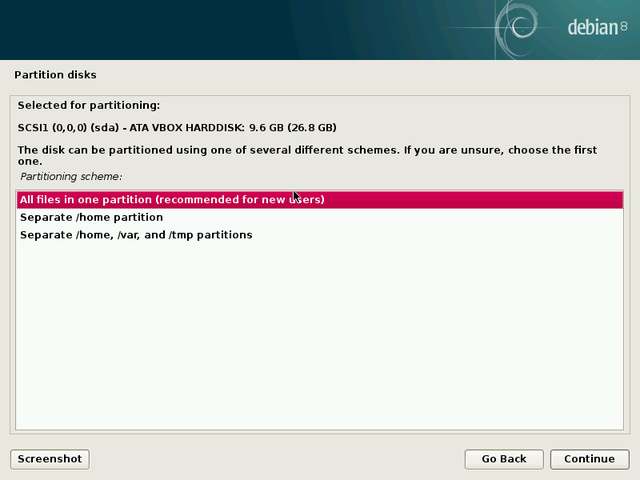
5.3.5.3.Patitioning scheme selection
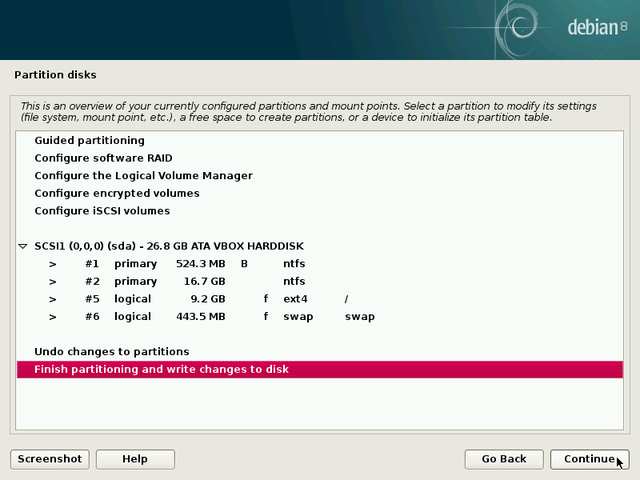
5.3.5.4.Modify or finish the partitioning
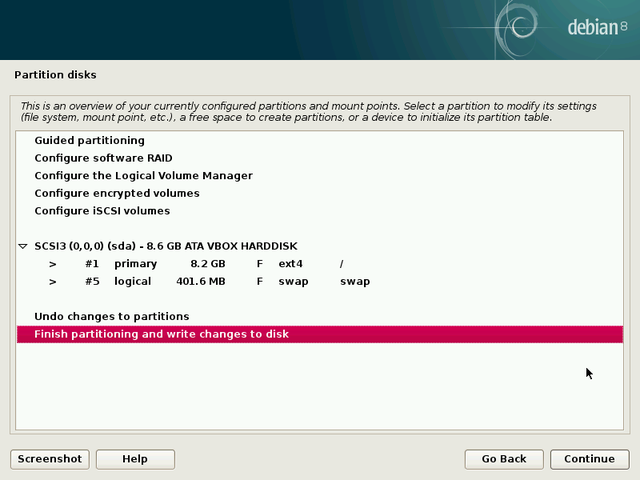
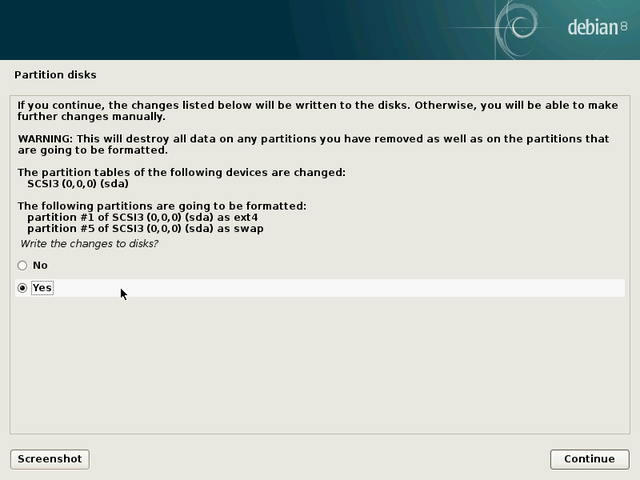
5.3.5.5.Partitioning overview and formating process launch
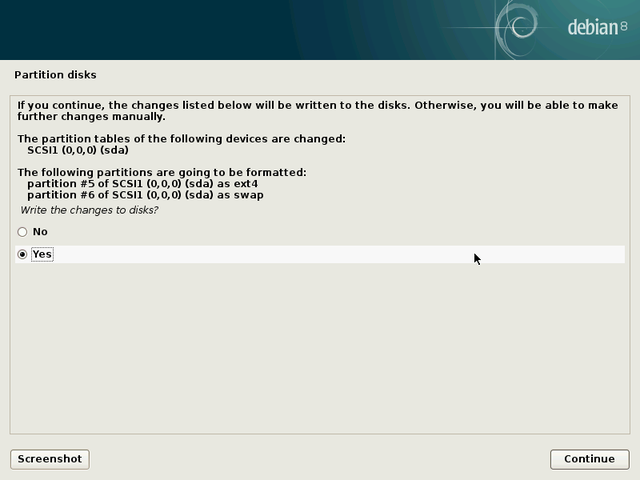
 Warning: this is the step during which the installer will format the
partition
s.
Warning: this is the step during which the installer will format the
partition
s.
The data on the selected disk will be erased !
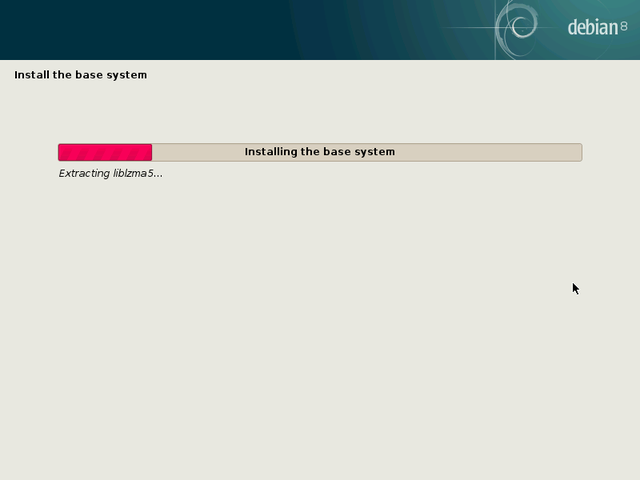
5.3.6.Package management configuration
A package is an archive which can include software, documentation, configuration files or plenty of other things (cf. Wikipedia51).
5.3.6.1.Analysis of the CD/DVD complementary contents (if necessary)
Optional: Had you opted for a Debian CD set including all the packages needed for the installation, you would now insert the second CD (and tick the "Yes" option).
5.3.6.2.Using the repository mirrors
 … where should I put this mirror ?
"A repository mirror " is a computer server, available on-line, hosting the full set of the Debian packages. If you don't have all the CDs on hand, Debian will grab the software or the packages you need on the network mirror servers.
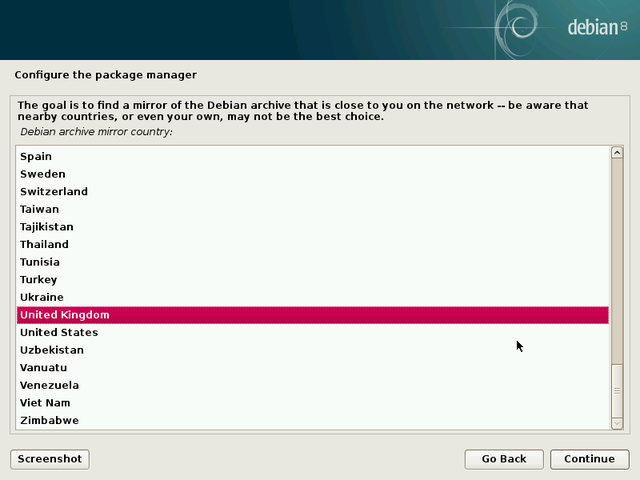
There are repository servers all around the world, each one being the exact copy (mirror) of the others. In this example we select "Yes" and in the following section we will pick an Internet mirror located in the United Kingdom.
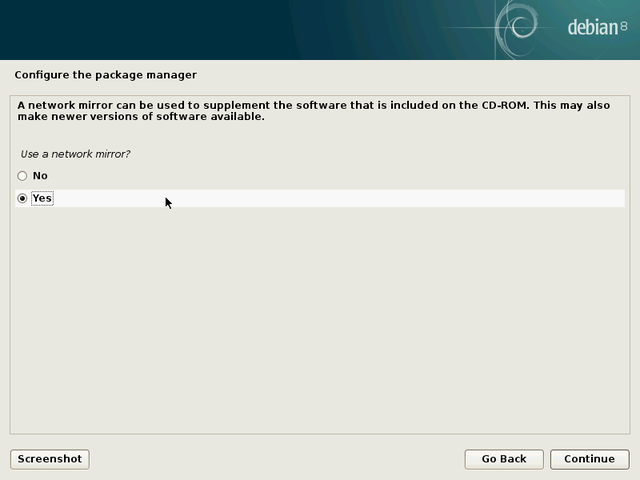
Note that later on, you will be able to optimize the access to the various repositories by using httpredir (see chap.8.1.3.1).
5.3.6.3.Selecting the network mirror country
5.3.6.4.Selecting the server hosting the archive mirror
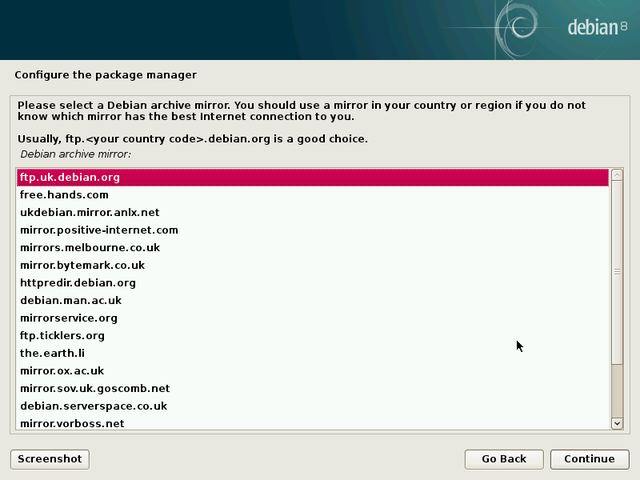
The server proposed by default is usually a good choice.
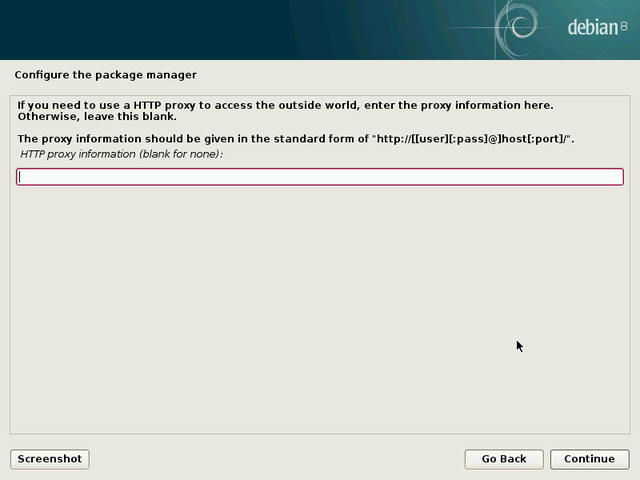
5.3.6.5.Configuring a proxy server (if necessary)
Leave this field empty, if you don't know.
5.3.6.6.Participating - or not - to the Debian popularity-contest
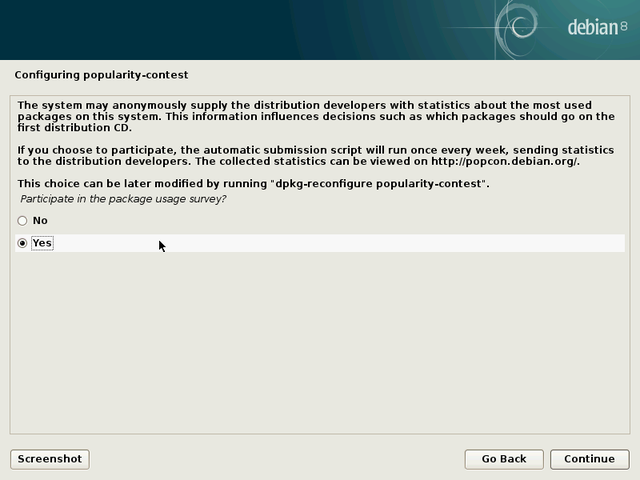
This can be useful to the community, but it is not mandatory.
5.3.6.7.Selecting software
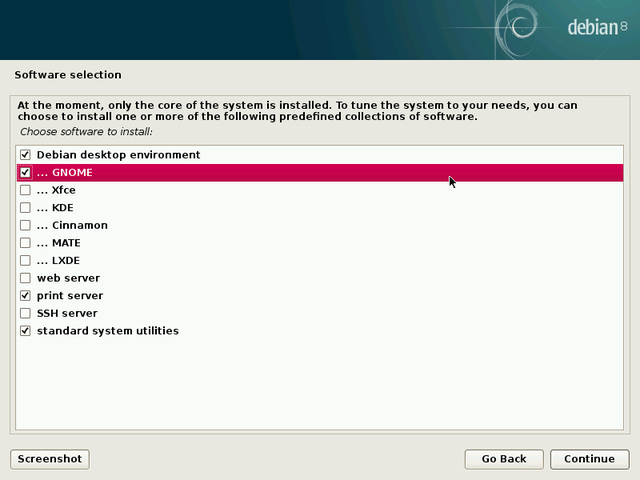
Now, it is time to select your main desktop interface, as well as the main services to be installed by default. Note that you can select several desktops in view of directly installing several environments. Hereafter a summary description of the proposed choices:
-
Debian desktop environment let you install, or not, a desktop. The desktop environment installation can be done later on, or never, and it is not indispensable, for example on a server. But if you are a beginner , a graphical interface will be easier to master
 .
.
Among the various available desktops, you can find: Gnome , Xfce , KDE , Cinnamon , MATE et LXDE -
web server includes a preselection of packages dedicated to Web servers.
-
print server includes a preselection of packages dedicated to Print servers.
-
SSH server allows you to activate the ssh protocol, and computer remote control.
Warning ! Enabling the SSH service might create a security breach if it is not correctly configured. For experienced user s only. -
standard system utilities includes a collection of applications to manage your operating system .
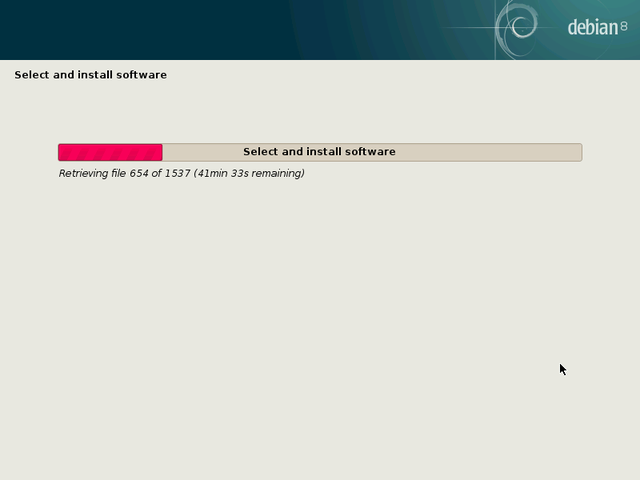
5.3.6.8.Packages installation
Time to take a little pause. Downloading and installing the packages may take quite some time, depending on the power of your computer and the Internet connection bandwidth.
5.3.7.Finishing the installation
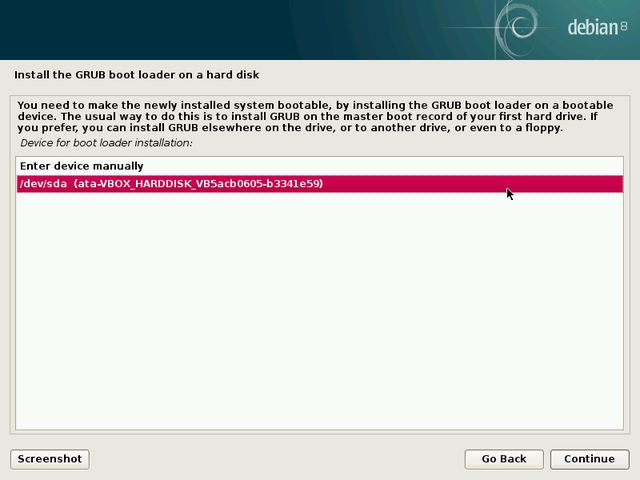
5.3.7.1.Installing Grub, the boot loader
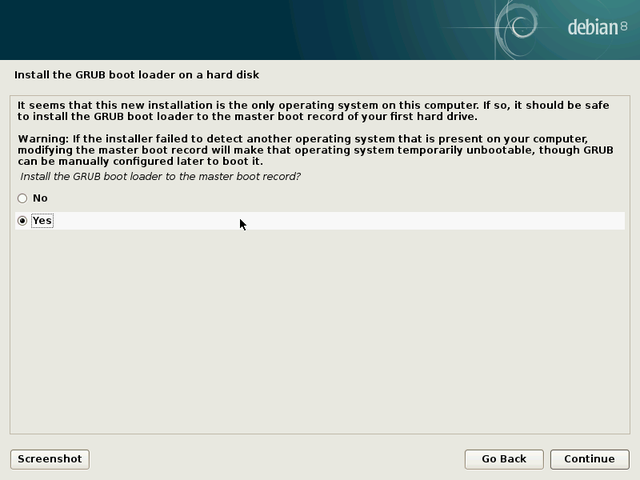
5.3.7.2.Selecting the Grub location
When the system installation is of type "simplified single-boot ", you should install Grub on your machine main disk , usually identified under the nice "/dev/sda" name.
5.3.7.3.Installation complete
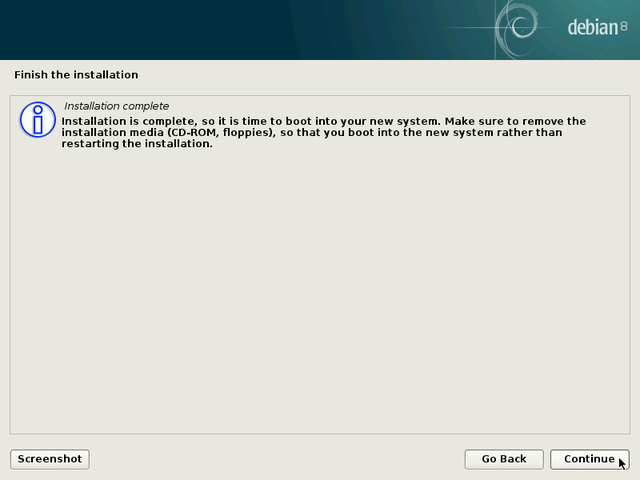
Don't forget to remove the CD or USB key to avoid re-launching the installer during the next boot.
Then complete the installation process by pressing the Continue button.
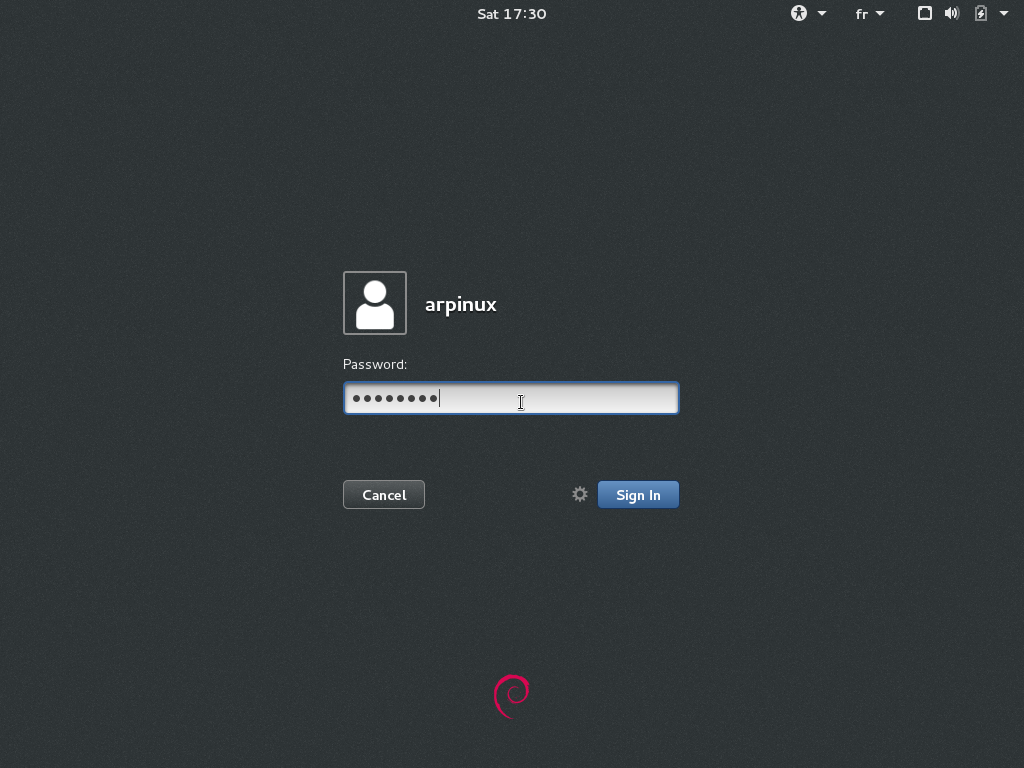
5.3.8.Debian first start-up
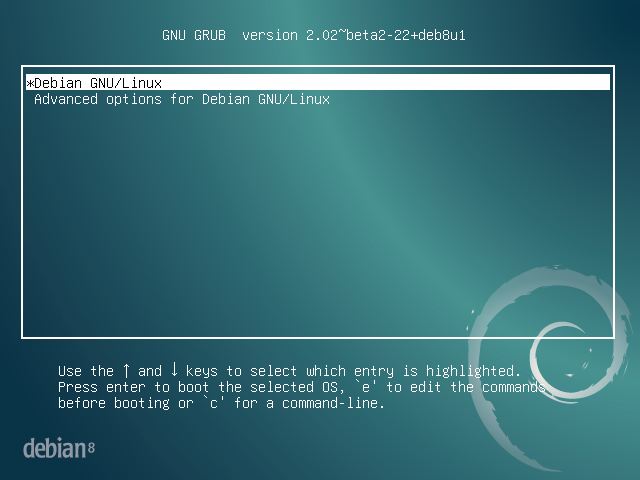
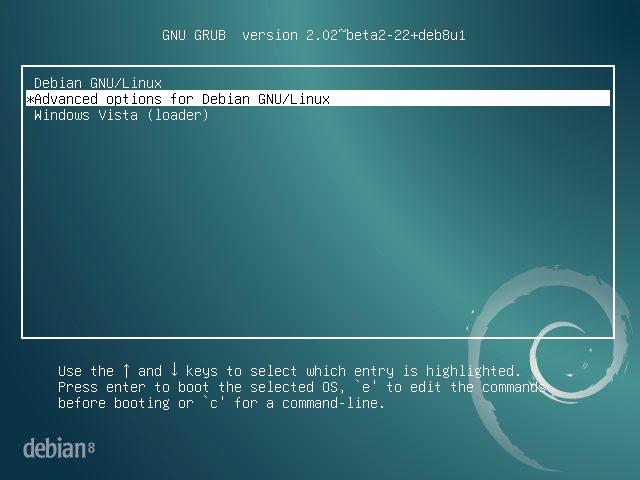
Grub boot loader selection menu:
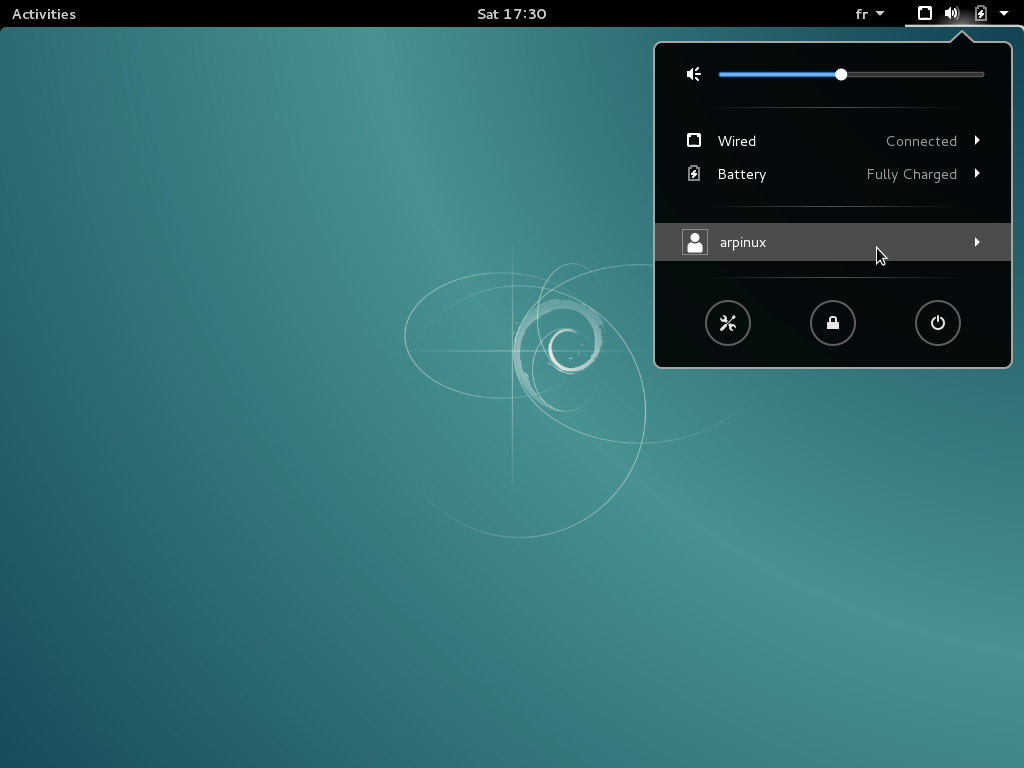
Interface by default on the Debian Gnome 3.14 desktop:
5.4.Dual-boot installation
The Dual-boot mechanism let you install side-by-side two independent operating system s, and doing so, allows you to select, at boot time, which one you want to launch.
 This is not the recommended method
: there are inherent risks for your data during the
partition
resizing. If you choose this solution to get started on Debian, please remember that you can very well test it first by using a
Live
session
(chap.5.2.1.4) with no risks for your data.
This is not the recommended method
: there are inherent risks for your data during the
partition
resizing. If you choose this solution to get started on Debian, please remember that you can very well test it first by using a
Live
session
(chap.5.2.1.4) with no risks for your data.
More information of the Debian Dual-Boot Wiki52
5.4.1.Back-up the original system
The very first thing to do , if you foresee a Debian installation next to another operating system (Windows® or Linux), is to back up your data and/or the entire system , just in case of problems, or if, later, you wish to return to the previous situation and restore your original system on the hard disk.
The most secure method is to clone your entire system using CloneZilla (chap.9.4)
-
This will give you the opportunity to restore your system to the exact same state it was before. And you will not lose any data, including the MBR and the partition table.
-
You can expect a transfer time of about 3 to 4 hours, in order to clone a 320 GB hard disk. After that, you can resume your normal activity.
-
Small caution: don't start such operation under stormy weather conditions …
This warning is not there to tell you that everything should break ! But partition resizing is always subject to risks, let it be a hardware problem (main switch going off, kids running over the power cords) or a software one (stupid crash of the application, right in the middle of the partitioning). This happens rarely, but you don't want to be part of the bad side of the statistics.
If you don't judge necessary to save the entire system, at least copy your personal data on an external medium ( chap.9.3 ).
5.4.2.Preparing the disk before installation
Once your system is cloned and/or your personal data secured (case of …), we can move to the preparation steps before the installation: we need to make some room for Debian.
This part is relevant only if the dual-boot is to be installed on the same hard disk. If you plan to install Debian on its own separated disk, you can jump to the actual installation.
The preparation boils down to a simple two steps process:
-
Defrag your hard disk from the Configuration panel . Please note that the defrag mentation process leads to a premature wear of your SSD hard disk: verify first with the defrag tool that this procedure is really needed to gain some disk space.
-
Free some space by reducing the size of the 'C:' partition on your disk, by using the disk manager.
5.4.2.1.Defragmenting under Windows®
To defrag ment your diks , according to the Microsoft support team 53 :
-
Open the Disk Defrag menter tool by clicking the Start button.
In the search box, type Disk Defrag menter, and then click Disk Defrag menter , in the list of results -
Under Current status , select the disk you want to defrag ment.
-
To determine if the disk needs to be defrag mented or not, click on Analyze disk . If you are prompted for an administrator password or confirmation, provide password or confirmation.
Once Windows® is done analyzing the disk, you can check the percentage of fragmentation on the disk in the Last Run column. If the number is above 10%, you should defrag ment the disk. -
Click on Defrag ment disk . If you're prompted for an administrator password or confirmation, provide password or confirmation.
Disk Defragmenter might take from several minutes to a few hours to complete, depending on the size and degree of fragmentation of your hard disk. You can still use your computer during the defragmentation process.
5.4.2.2.Freeing space for Debian
From your Windows® system, launch the Disk Management tool by clicking on the
Start
button and type "
partition
" in the search box. From the results click on "Create and format hard disk
partition
s".
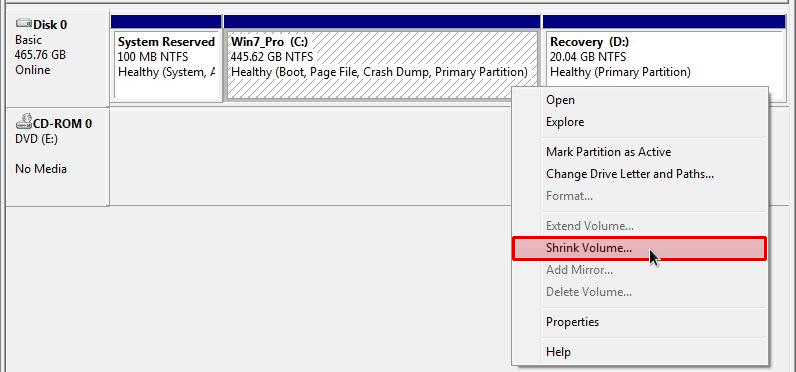
A new window which is open, displays all the disks and
partition
s of the system. Select the
partition
you want to reduce to make room for Debian, and then right-click > "Shrink volume":
A new window lets you adjust the partition settings. Double check them and press "Shrink".
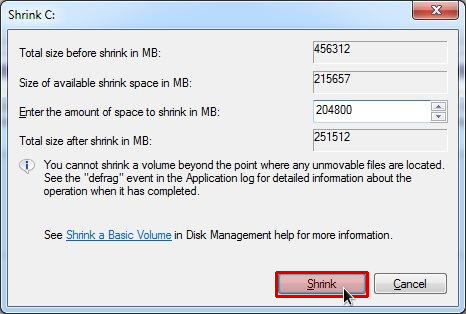
You can check, in the main disk manager window, that the requested Debian space has been correctly freed.

5.4.3.Launch the Debian installation
The process begins the same way as for the Simple Boot installation, until the partition ing step (chap.5.3.5).
The pictures presented hereafter do not display the values as seen in the previous chapter. They are here only to show an example of dual-boot partitioning. (Screen captures realized by using VirtualBox54)
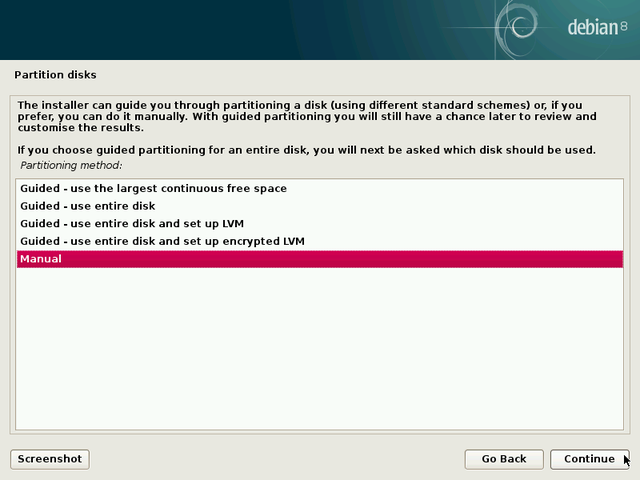
5.4.3.1.Manual hard disk partitioning
Depending on your situation you can select the "Guided - use the largest continuous free space" option, or the "Manual" one. We are choosing this second option to avoid mistakes, and make sure we select the right disk in the following step.
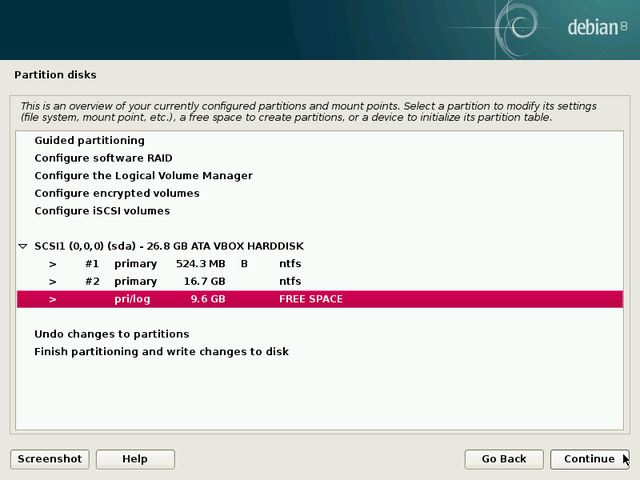
5.4.3.2.Selecting the free space
Select now the free space you have released during the disk preparation under Windows®
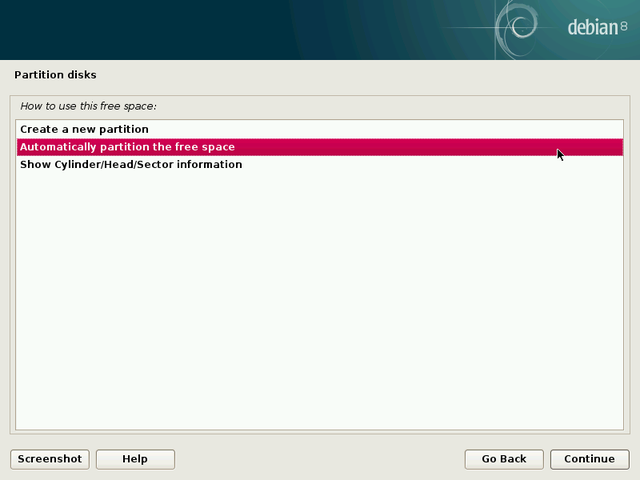
5.4.3.3.Automatic partitioning of the free space
We leave it up to Debian to configure the free space …
5.4.3.4.Selecting the partioning scheme
Debian will create an "Extended partition " within which the "Logical partition s" of the new system are going to be integrated. The option "All files in one partition …" is a reasonable choice.
5.4.3.5.Checking the proposed partitioning
5.4.3.6.Accepting the partitioning
Warning ! The real partitioning begins at this stage, and Debian is taking place on your hard disk.
5.4.3.7.Basic system installation
The installation starts like for the Simple Boot method ( chap.5.3.5.5 ).
At the end of the process, the Grub boot loader menu will list your new Debian system as well as the previously used system. You will have the choice (here with Debian and Windows©):
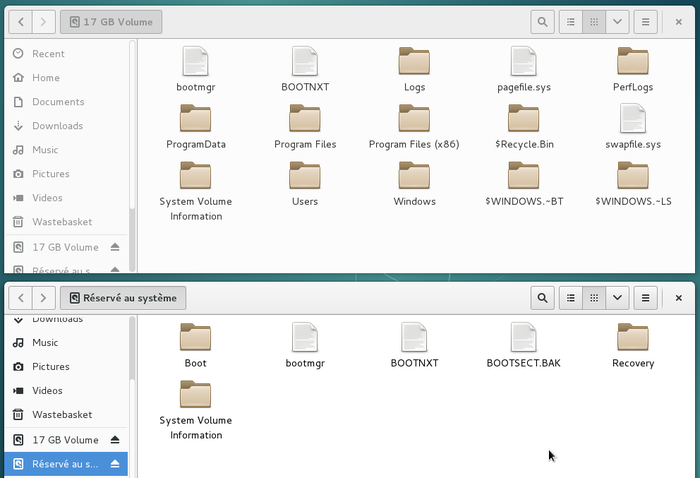
Once you get on your Debian working session, you have a complete access to the data stored in the other system.
5.5.On-line installation details
Debian offers more possibilities than just the two methods explained in the previous chapters.
But this manual being intended for the
beginner
s, the more complex installation modes are detailed in the official Debian documentation:
https://www.debian.org/releases/stable/installmanual
Just to give you a flavor of the other installation modes:
5.5.1.LVM ... what's that?
LVM is an acronym for L ogical V olume M anager.
Is usage consists in:
-
Create a specific partition of type " LVM " (which corresponds to a mounted disk )
-
Within this partition we can create "Logical Volumes" (corresponding to partition s ) that we can modify at will, themselves sized and formated to our own convenience.
So, the "Logical Volumes" utilization, replaces straight out the usual disk "partitioning", and provide a more flexible way to manage disk space by allowing modifications on them at any point of time.
It is possible, as well, to keep one part of the LVM partition without installed "Logical Volume" pending further decisions.
More details on the dedicated Debian LVM Wiki: https://wiki.debian.org/ LVM
5.5.2.Encryption ... what's for ?
The confidentiality of personal data is is a pretty hot topic these days. In order to better protect your data, you can opt for an encrypted installation ; With this kind of installation, even in the case of theft of your computer , or the removal of its hard disk, no data access is possible with the password !
The Debain Administrator's Handbook provide us with more details55:
"This feature can be added underneath any filesystem, since, as for LVM , Linux (and more particularly the "dm-crypt" driver ) uses the Device Mapper to create a virtual partition (whose content is protected) based on an underlying partition that will store the data in an encrypted form (thanks to LUKS , Linux Unified Key Setup , a standard format that enables the storage of encrypted data as well as meta-information that indicates the encryption algorithms used)."
To put it simply, LUKS creates a container to host an encrypted volume protected by a password.
For more information and a complete guide, visit the digital self-defense guide: https://ssd.eff.org/en
5.5.3.RAID ... does it hurt ?
Wikipédia56 is my friend …
RAID is the acronym of redundant array of independent disks .
RAID is a data storage virtualization technology that combines multiple physical disk drive components into a single logical unit for the purposes of data redundancy, performance improvement, or both.
Please note that the Debian installation in RAID mode, uses the RAID software (thanks to the mdadm tool) and not the RAID hardware (handled by a physical RAID controller).
For more details and installation tutorial see the official Debian wiki https://wiki.debian.org/ Software RAID or the dedicated section of the Debian Administrator 's HandBook 57
47 https://www.debian.org/releases/stable/installmanual
48 https://en.wikipedia.org/wiki/BitTorrent
49 http://www.howtogeek.com/129815/beginner-geek-how-to-change-the-boot-order-in-your-computers-bios/
50 https://wiki.debian.org/UEFI
51 https://en.wikipedia.org/wiki/Package_manager
52 https://wiki.debian.org/DualBoot
53 https://support.microsoft.com/en-us/help/17126/windows-7-improve-performance-defragmenting-hard-disk
54 https://wiki.debian.org/VirtualBox
55 https://debian-handbook.info/browse/en-US/stable/sect.installation-steps.html#sect.install-partman
56 https://en.wikipedia.org/wiki/RAID
57 https://debian-handbook.info/browse/stable/advanced-administration.html#sect.raid-soft